Superwash versus Non-Superwash Dye Technique Test (PART 1)
What are the dye uptake and color refraction differences in superwash versus non-superwash yarn across 3 different techniques.
 Featuring: Knomad Worsted Weight Marshmallow (superwash merino) and Spark (non-superwash organic merino)
Our Goal: Cross compare 3 different dye techniques in the same pot with the same colors to find the differences in dye uptake, color refraction and the different characteristics of superwash vs non-superwash for garment knitting.
Stressed for time and want an abstract? Here ya go:
Abstract: Take your 2 favorite bases from Knomad (3 skeins each), one a superwash and the other a non superwash wool. Using a hot laminator, create hang tags for the yarn so you can keep your bases labeled during the dye test.
On the resist technique, you’ll tie 4 resists on one skein of superwash, 4 resists on the non superwash, and create a 4% d.o.s. Background dye color (200 grams x .04 = 8 grams of dye). When cooled, remove the resists and overdye fluorescent rainbow.
For the speckle, we add 50% dye and 50% fine restaurant salt to a salt shaker. Heat set the bare yarn and a teaspoon of citric acid to 206 degrees in a proofer, oven, or steamer, then remove, speckle with the shaker, and put back into the heat for an additional 30 minutes.
For the kettle dye, heat set the yarn in a low water table acidic bath to 206, remove from the heat, and use a 60 ml luer lock syringe to paint in the dye color, flip, speckle the back, and return to the heat for 30 minutes. Rinse when cool. Then create swatches for each skein to compare the differences.
For those with time to read the finer details, let’s dive in!
Featuring: Knomad Worsted Weight Marshmallow (superwash merino) and Spark (non-superwash organic merino)
Our Goal: Cross compare 3 different dye techniques in the same pot with the same colors to find the differences in dye uptake, color refraction and the different characteristics of superwash vs non-superwash for garment knitting.
Stressed for time and want an abstract? Here ya go:
Abstract: Take your 2 favorite bases from Knomad (3 skeins each), one a superwash and the other a non superwash wool. Using a hot laminator, create hang tags for the yarn so you can keep your bases labeled during the dye test.
On the resist technique, you’ll tie 4 resists on one skein of superwash, 4 resists on the non superwash, and create a 4% d.o.s. Background dye color (200 grams x .04 = 8 grams of dye). When cooled, remove the resists and overdye fluorescent rainbow.
For the speckle, we add 50% dye and 50% fine restaurant salt to a salt shaker. Heat set the bare yarn and a teaspoon of citric acid to 206 degrees in a proofer, oven, or steamer, then remove, speckle with the shaker, and put back into the heat for an additional 30 minutes.
For the kettle dye, heat set the yarn in a low water table acidic bath to 206, remove from the heat, and use a 60 ml luer lock syringe to paint in the dye color, flip, speckle the back, and return to the heat for 30 minutes. Rinse when cool. Then create swatches for each skein to compare the differences.
For those with time to read the finer details, let’s dive in!

 Take your favorite superwash and non-superwash bases from Knomad and soak them in 2 gallons of warm water, a tablespoon of citric acid, and a teaspoon of synthrapol for a minimum of 2 hours. Gently squish out the excess water so they’re damp but not soaking wet and lay both skeins in the pan.
You can lay on plastic wrap to pop in the streamer or a food tray/pot in the oven. When the yarn is very hot, but not boiling, pull out and speckle with your salt shaker equally across both skeins, then mist with the citric acid water to fix speckles in place. Put back in the heat for 30 minutes to one hour so all dye is absorbed.
Dharma Trading: Purple Pop, Fluorescent Lemon, Fluorescent Safety Orange, Spearmint Breeze, Bright Aqua
Pro-Chem and Dye Washfast Acid: Hot Pink
Aljo: Lily Rose
I mix the salt and dye 50/50 by volume, not weight. This allows me to speckle and get a more uniform margin and diameter on the speckle by mixing it with salt. Very powdery dyes like fluorescent lemon or hot pink usually drop in a clump, not a speckle, and using the shakers gives me more uniformity on speckle size.
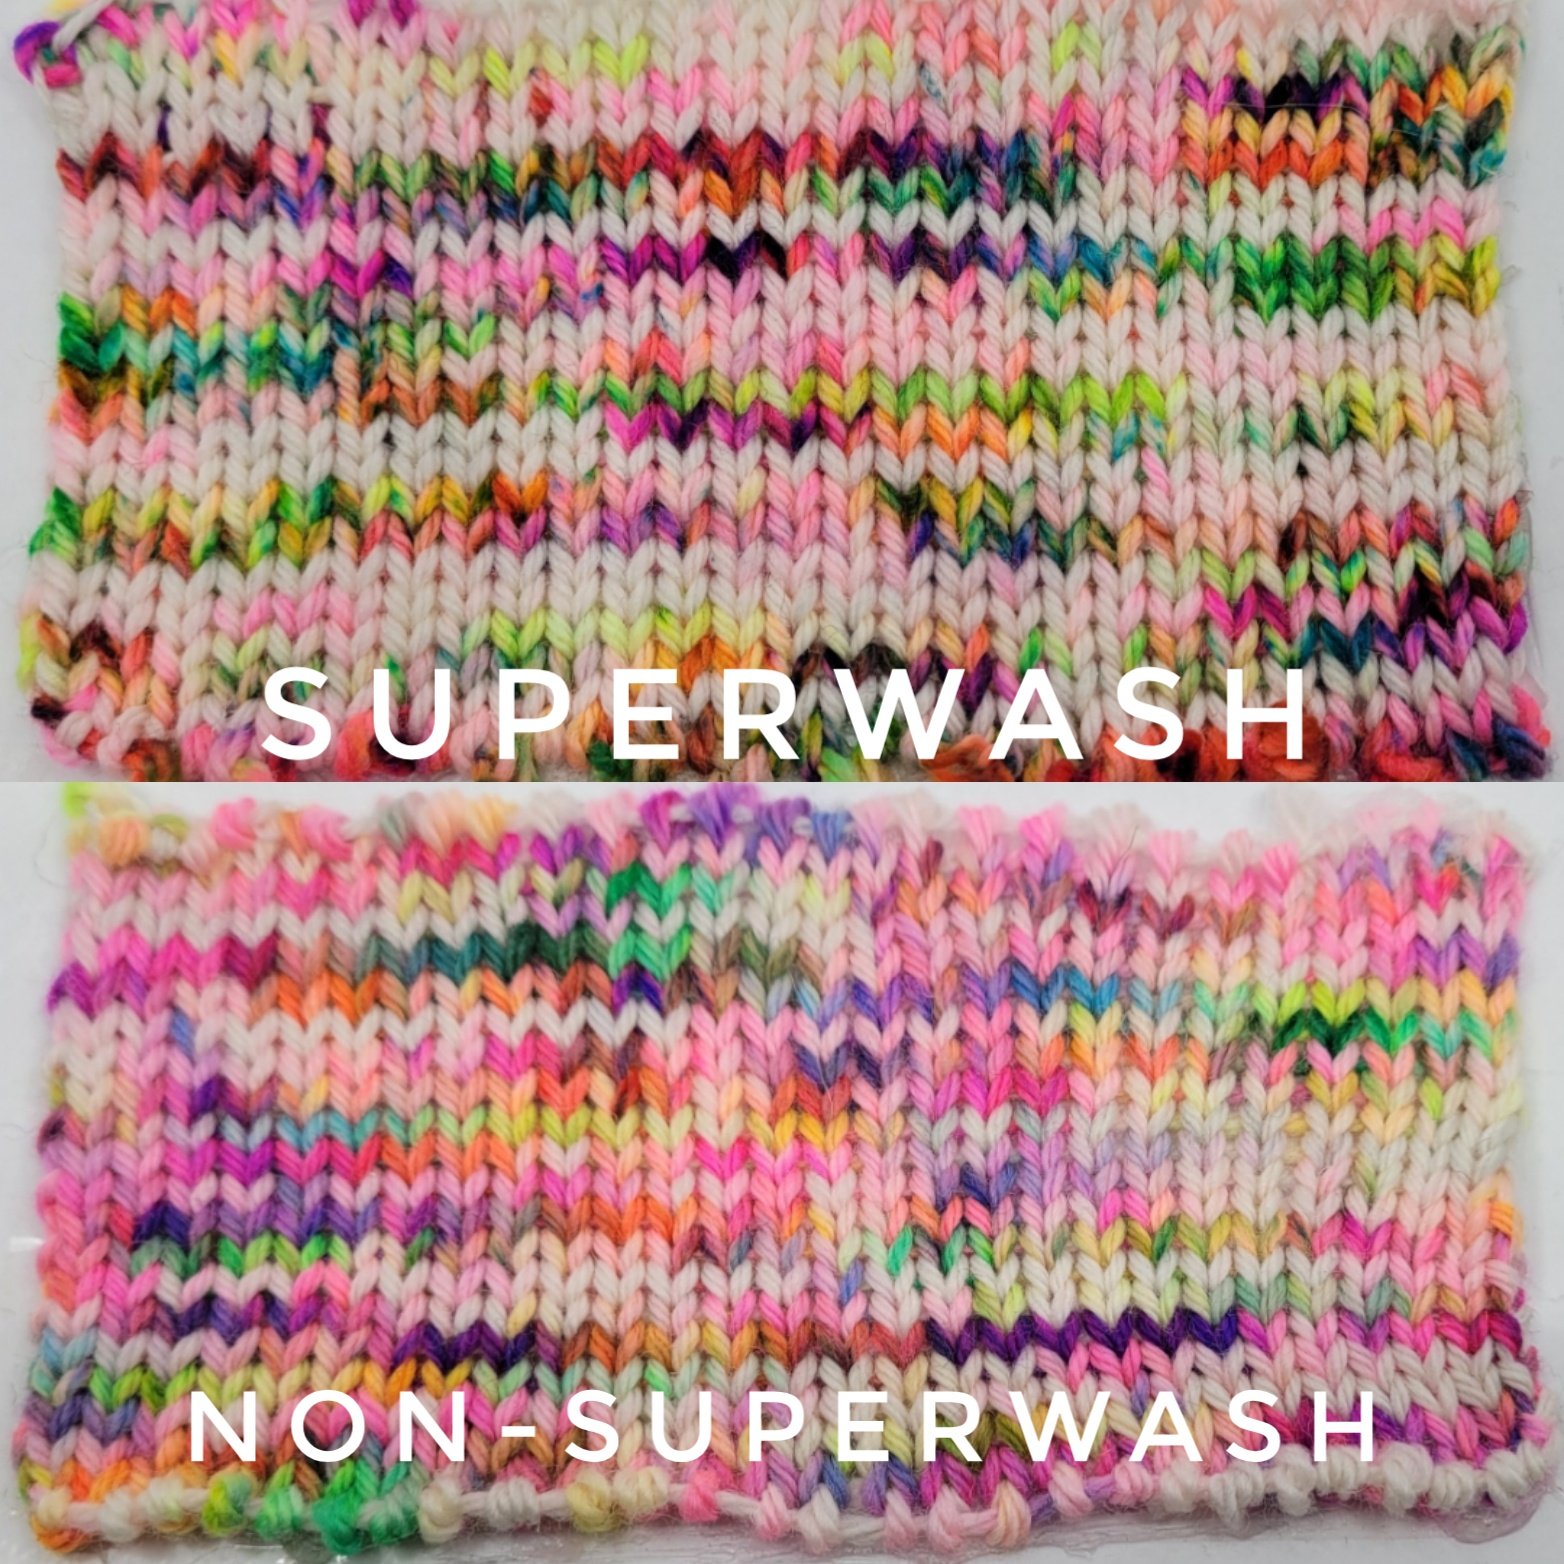
Conclusion: For a soft, watercolor diffusion of color, a non-superwash blend will give you that overmixed effect with lots of second and third tones between colors
Take your favorite superwash and non-superwash bases from Knomad and soak them in 2 gallons of warm water, a tablespoon of citric acid, and a teaspoon of synthrapol for a minimum of 2 hours. Gently squish out the excess water so they’re damp but not soaking wet and lay both skeins in the pan.
You can lay on plastic wrap to pop in the streamer or a food tray/pot in the oven. When the yarn is very hot, but not boiling, pull out and speckle with your salt shaker equally across both skeins, then mist with the citric acid water to fix speckles in place. Put back in the heat for 30 minutes to one hour so all dye is absorbed.
Dharma Trading: Purple Pop, Fluorescent Lemon, Fluorescent Safety Orange, Spearmint Breeze, Bright Aqua
Pro-Chem and Dye Washfast Acid: Hot Pink
Aljo: Lily Rose
I mix the salt and dye 50/50 by volume, not weight. This allows me to speckle and get a more uniform margin and diameter on the speckle by mixing it with salt. Very powdery dyes like fluorescent lemon or hot pink usually drop in a clump, not a speckle, and using the shakers gives me more uniformity on speckle size.
Conclusion: For a soft, watercolor diffusion of color, a non-superwash blend will give you that overmixed effect with lots of second and third tones between colors
 Superwash on bottom, non-superwash on top
 Superwash on the right, non-superwash on the left

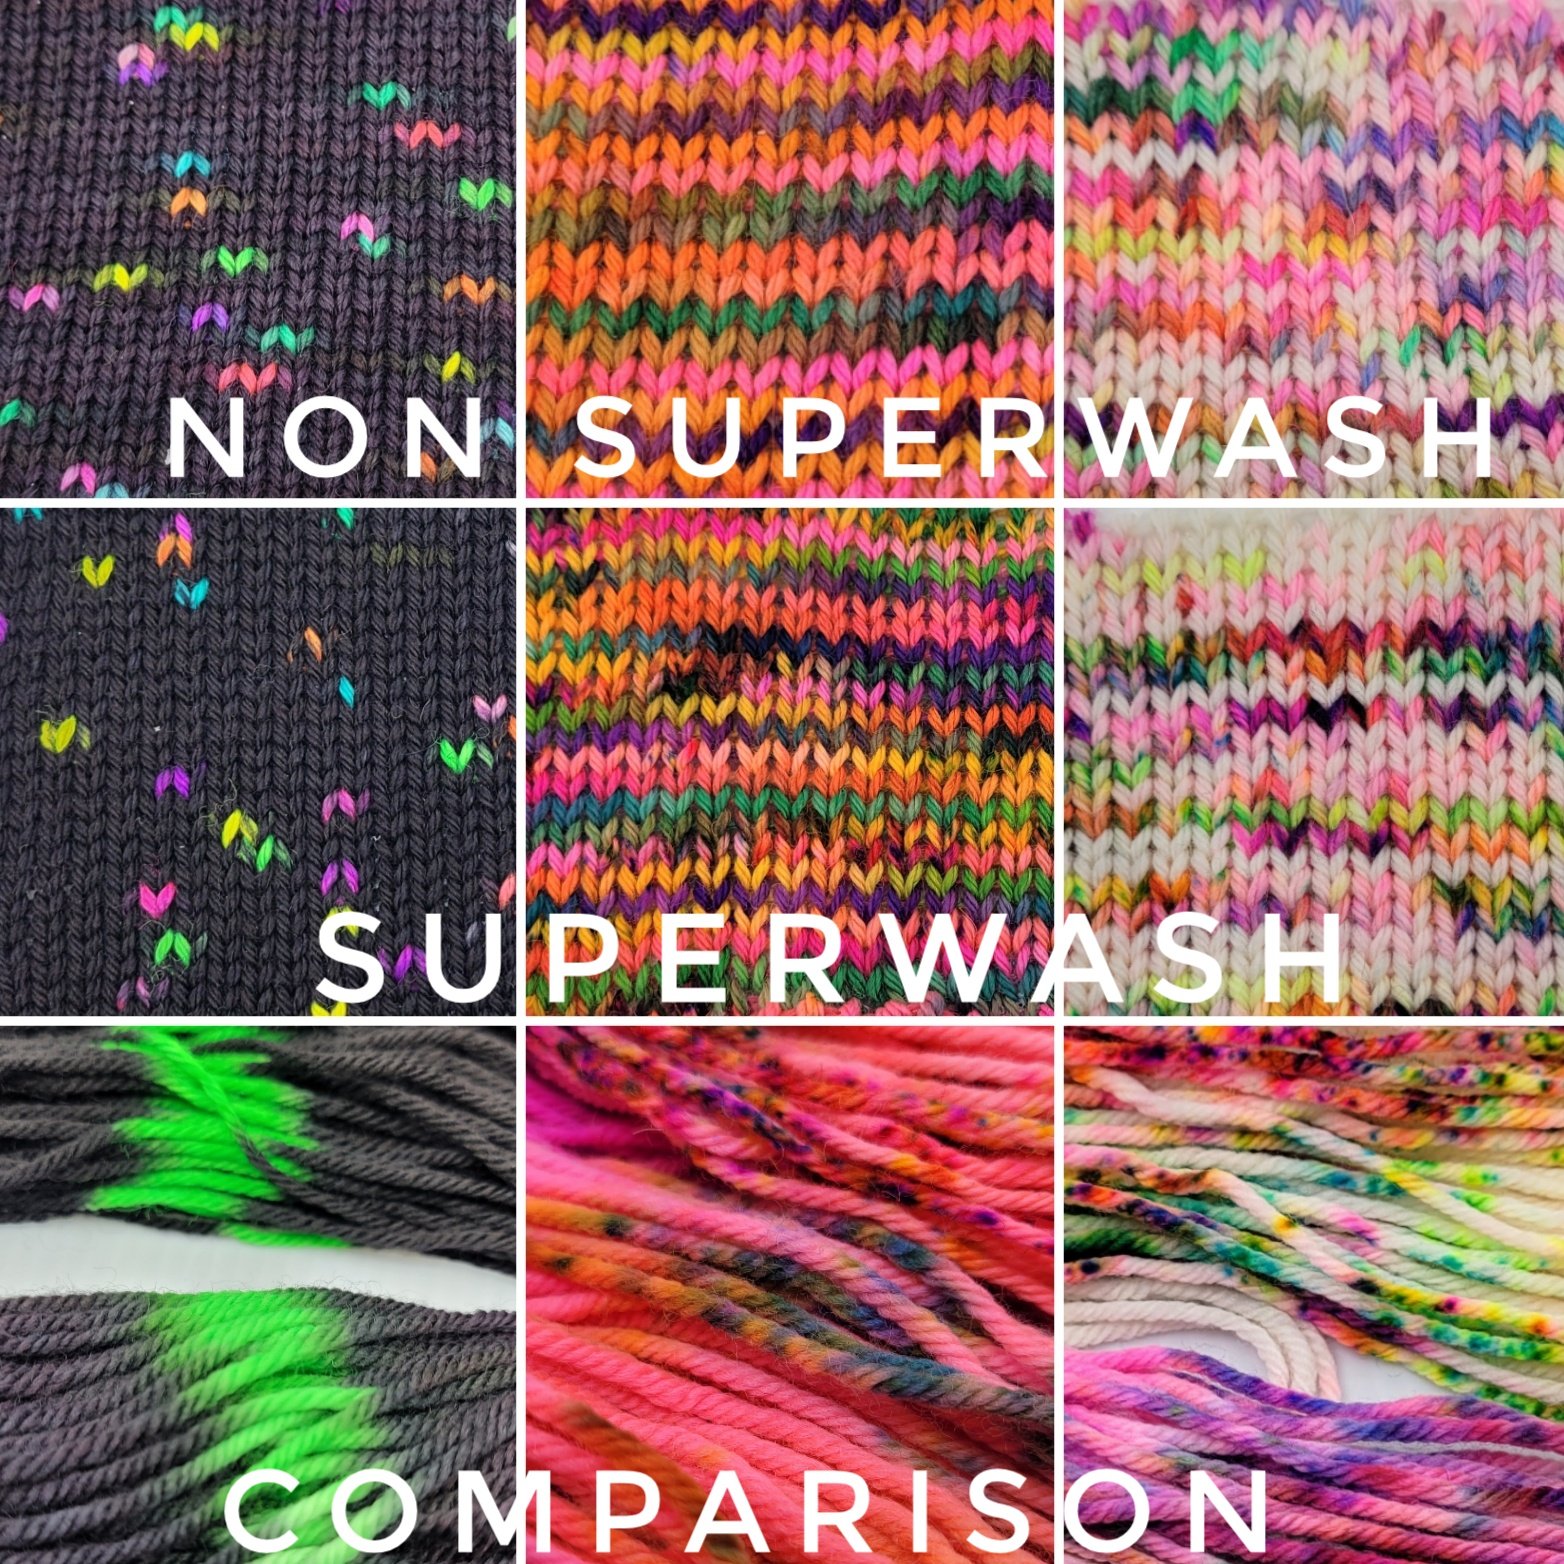
 If you look closely at the photos, you can see the identical section of the skein that received the identical speckling and how different they look
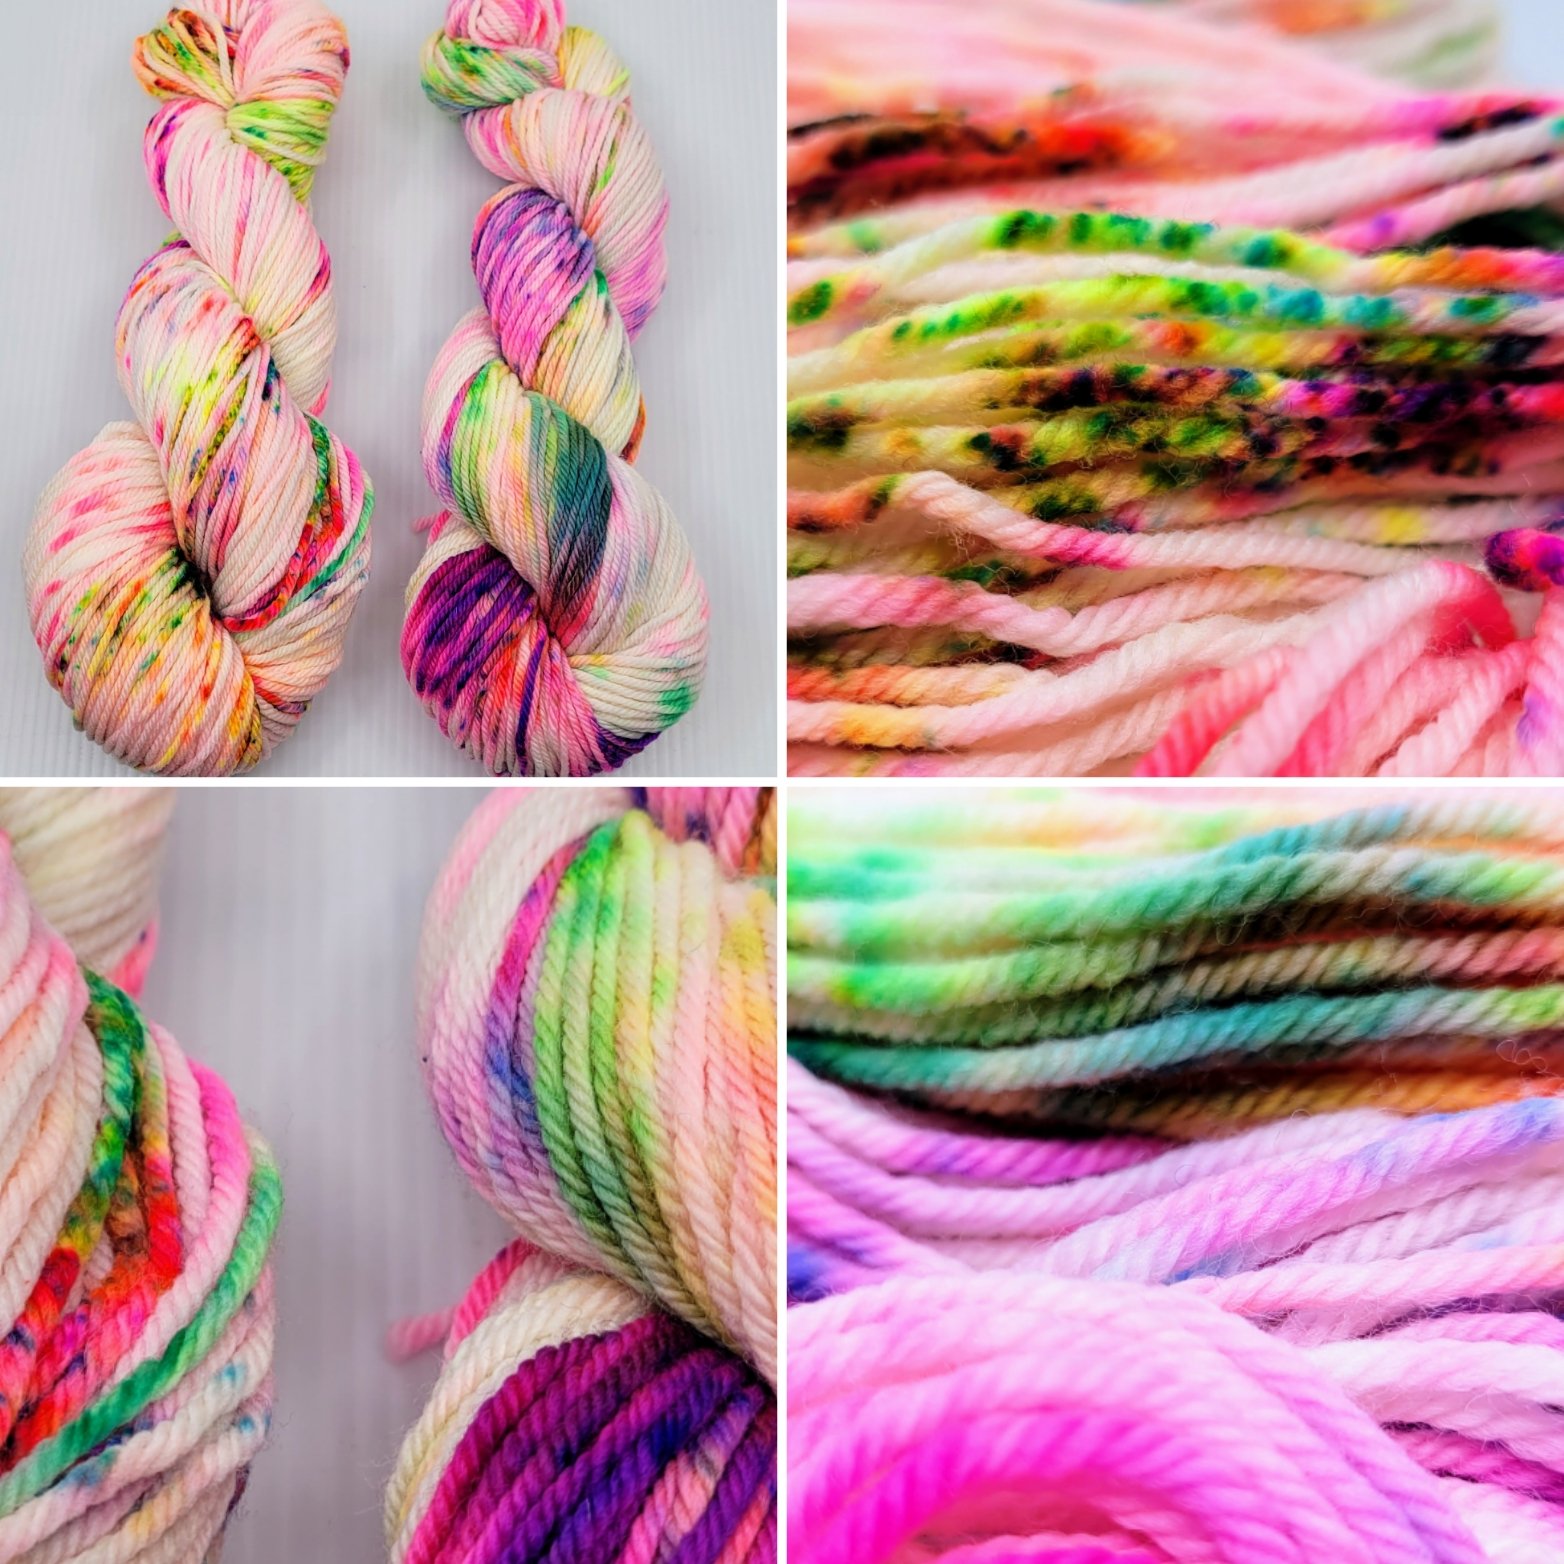
For crisp, clean speckles with minimal back bleeding or color mixing, superwash will give you the color saturation and pops of color on a white background.
If you look closely at the photos, you can see the identical section of the skein that received the identical speckling and how different they look
For crisp, clean speckles with minimal back bleeding or color mixing, superwash will give you the color saturation and pops of color on a white background.
 Take your favorite superwash and non-superwash bases from Knomad and soak them in 2 gallons of warm water, a tablespoon of citric acid, and a teaspoon of synthrapol for a minimum of 2 hours. Gently squish out the excess water so they’re damp but not soaking wet and lay both skeins in the pan.
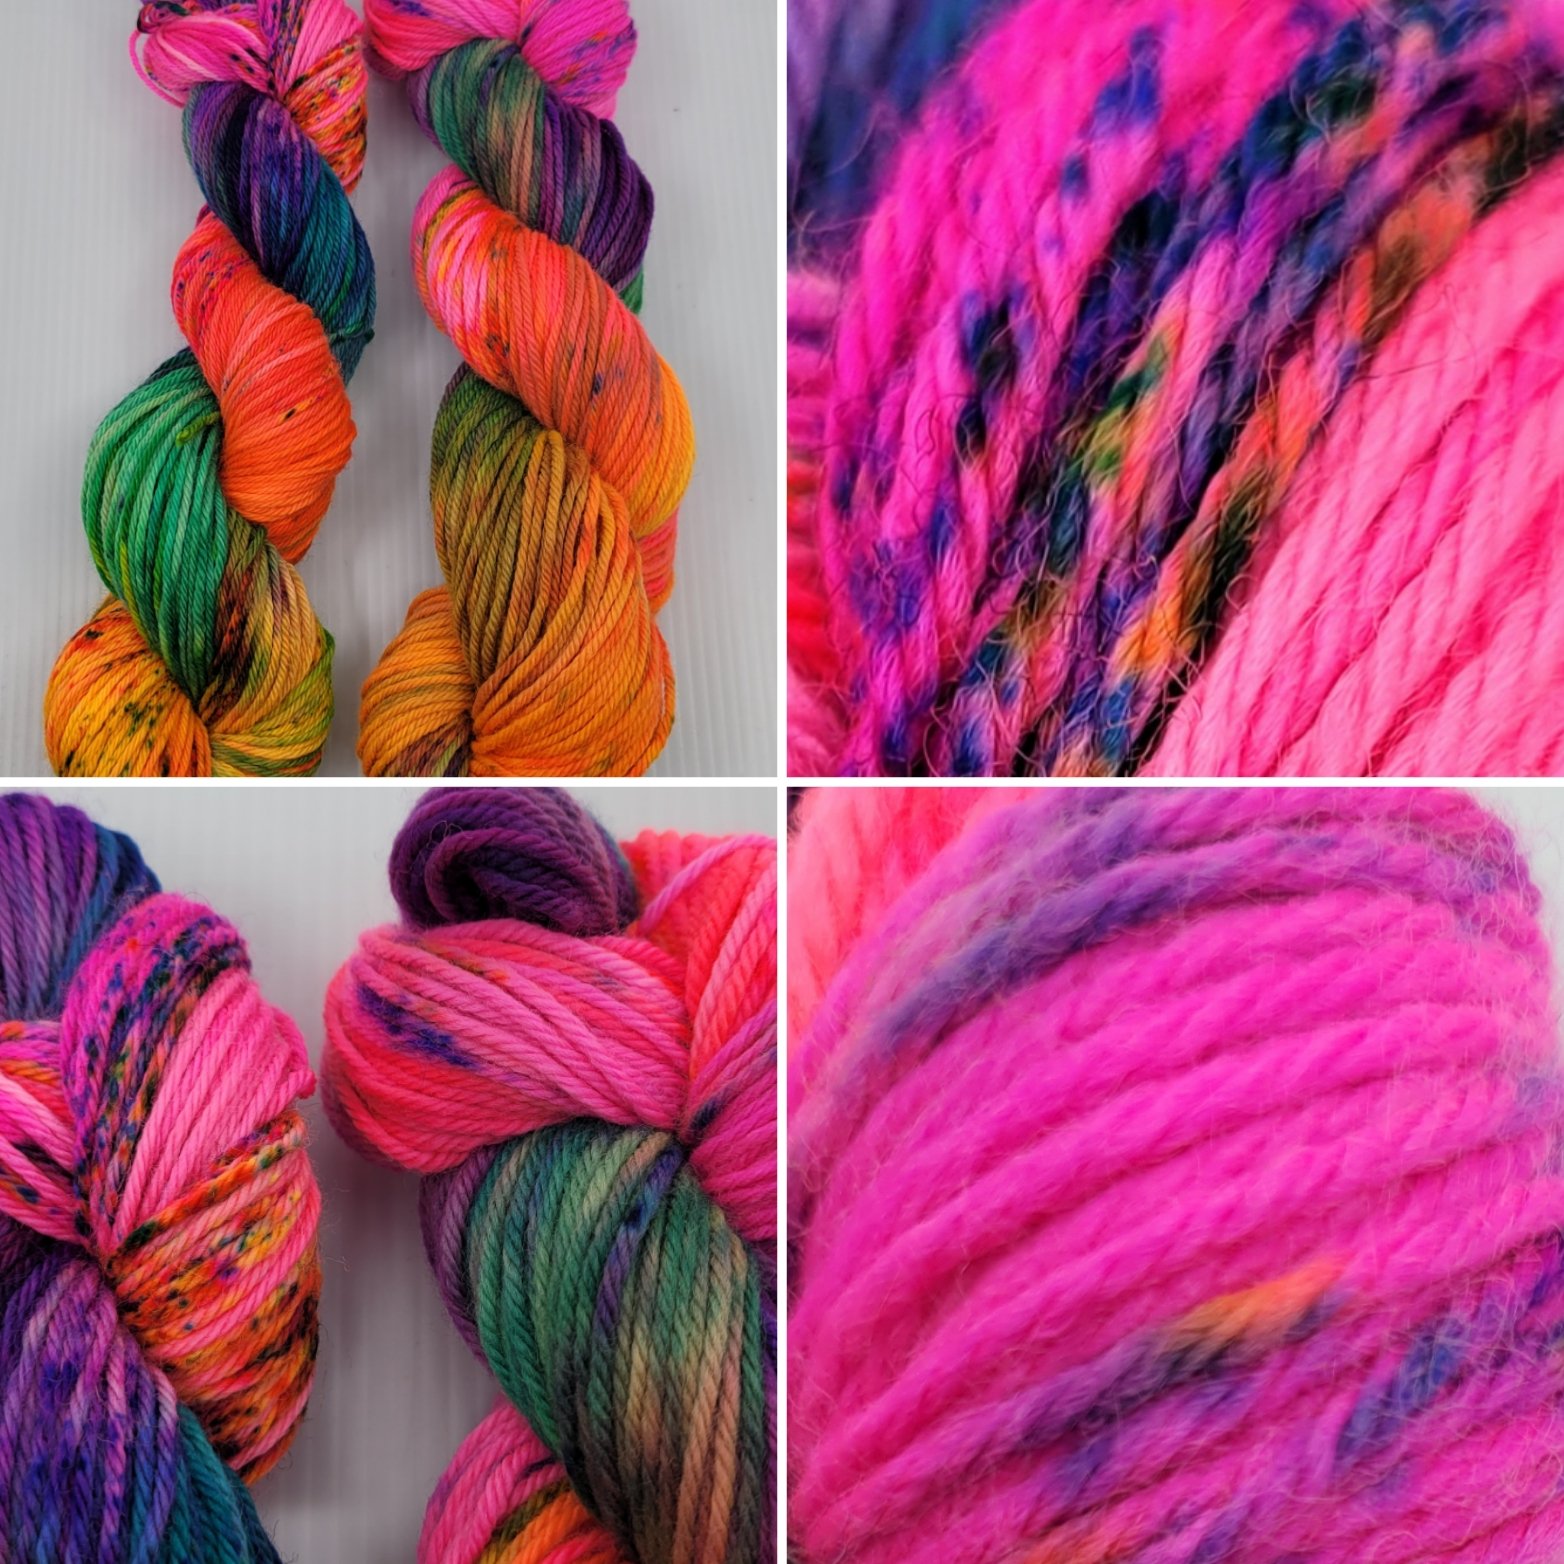
You can lay on plastic wrap to pop in the streamer or a food tray/pot in the oven. When the yarn is very hot, but not boiling, pull out and paint colors in rainbow order, flip to the back side, repeat the color sequence, then speckle over the lighter sections and put back in the heat for 30 minutes to an hour.
Take your favorite superwash and non-superwash bases from Knomad and soak them in 2 gallons of warm water, a tablespoon of citric acid, and a teaspoon of synthrapol for a minimum of 2 hours. Gently squish out the excess water so they’re damp but not soaking wet and lay both skeins in the pan.
You can lay on plastic wrap to pop in the streamer or a food tray/pot in the oven. When the yarn is very hot, but not boiling, pull out and paint colors in rainbow order, flip to the back side, repeat the color sequence, then speckle over the lighter sections and put back in the heat for 30 minutes to an hour.
 Conclusion: Because non-superwash requires the yarn to be at temperature before the dye absorption process begins, the colors will blend and mix long before it actually starts adhering, leading to “muddier” colors and less optical saturation. For those that like a broken autumnal look and gentle color shifts between stitches, non-superwash will give you that effect.
For those that want maximum saturation and vibrancy with minimal overlapping of color at the margins, you will prefer the way superwash yarn absorbs dye on contact, before heat is applied. Approximately 60% of the dye adheres immediately and the remaining 40% when it is heat set. This is why the margins of the color are crisp and clear and remain where they were deposited.
Conclusion: Because non-superwash requires the yarn to be at temperature before the dye absorption process begins, the colors will blend and mix long before it actually starts adhering, leading to “muddier” colors and less optical saturation. For those that like a broken autumnal look and gentle color shifts between stitches, non-superwash will give you that effect.
For those that want maximum saturation and vibrancy with minimal overlapping of color at the margins, you will prefer the way superwash yarn absorbs dye on contact, before heat is applied. Approximately 60% of the dye adheres immediately and the remaining 40% when it is heat set. This is why the margins of the color are crisp and clear and remain where they were deposited.
 non-superwash on Left - Superwash on the right
 Non-superwash on the left, superwash on the right
 Notice how the non-superwash seems more “yellow/orange” and the greens are very tonal and diffused compared to the superwash?
 If you look closely at the photos, you can see the identical section of the skein that received the identical dye application and how differently they’re refracting color value.
To see more super-wash and non-superwash comparisons on resist dyeing check out the next post (part II).
If you look closely at the photos, you can see the identical section of the skein that received the identical dye application and how differently they’re refracting color value.
To see more super-wash and non-superwash comparisons on resist dyeing check out the next post (part II).
 Featuring: Knomad Worsted Weight Marshmallow (superwash merino) and Spark (non-superwash organic merino)
Our Goal: Cross compare 3 different dye techniques in the same pot with the same colors to find the differences in dye uptake, color refraction and the different characteristics of superwash vs non-superwash for garment knitting.
Stressed for time and want an abstract? Here ya go:
Abstract: Take your 2 favorite bases from Knomad (3 skeins each), one a superwash and the other a non superwash wool. Using a hot laminator, create hang tags for the yarn so you can keep your bases labeled during the dye test.
On the resist technique, you’ll tie 4 resists on one skein of superwash, 4 resists on the non superwash, and create a 4% d.o.s. Background dye color (200 grams x .04 = 8 grams of dye). When cooled, remove the resists and overdye fluorescent rainbow.
For the speckle, we add 50% dye and 50% fine restaurant salt to a salt shaker. Heat set the bare yarn and a teaspoon of citric acid to 206 degrees in a proofer, oven, or steamer, then remove, speckle with the shaker, and put back into the heat for an additional 30 minutes.
For the kettle dye, heat set the yarn in a low water table acidic bath to 206, remove from the heat, and use a 60 ml luer lock syringe to paint in the dye color, flip, speckle the back, and return to the heat for 30 minutes. Rinse when cool. Then create swatches for each skein to compare the differences.
For those with time to read the finer details, let’s dive in!
Featuring: Knomad Worsted Weight Marshmallow (superwash merino) and Spark (non-superwash organic merino)
Our Goal: Cross compare 3 different dye techniques in the same pot with the same colors to find the differences in dye uptake, color refraction and the different characteristics of superwash vs non-superwash for garment knitting.
Stressed for time and want an abstract? Here ya go:
Abstract: Take your 2 favorite bases from Knomad (3 skeins each), one a superwash and the other a non superwash wool. Using a hot laminator, create hang tags for the yarn so you can keep your bases labeled during the dye test.
On the resist technique, you’ll tie 4 resists on one skein of superwash, 4 resists on the non superwash, and create a 4% d.o.s. Background dye color (200 grams x .04 = 8 grams of dye). When cooled, remove the resists and overdye fluorescent rainbow.
For the speckle, we add 50% dye and 50% fine restaurant salt to a salt shaker. Heat set the bare yarn and a teaspoon of citric acid to 206 degrees in a proofer, oven, or steamer, then remove, speckle with the shaker, and put back into the heat for an additional 30 minutes.
For the kettle dye, heat set the yarn in a low water table acidic bath to 206, remove from the heat, and use a 60 ml luer lock syringe to paint in the dye color, flip, speckle the back, and return to the heat for 30 minutes. Rinse when cool. Then create swatches for each skein to compare the differences.
For those with time to read the finer details, let’s dive in!

- Gloves
- Respirator
- A way to heat set your yarn (steamer, proofer, oven, induction plate)
- Acid-Reactive Dye in Dharma fluorescent orange, fluorescent lemon, bright aqua, spearmint breeze, purple pop. Pro Chem WFA Black, Aljo Lily Rose
- 2.5” deep stainless steel restaurant tray
- Respirator
- Citric Acid
- Salt shaker filled with 50% dye and 50% table salt
- 6” reusable zip ties
- Gram Scale
- Continuous mist spray bottle
SPECKLING DIRECTIONS:
 Take your favorite superwash and non-superwash bases from Knomad and soak them in 2 gallons of warm water, a tablespoon of citric acid, and a teaspoon of synthrapol for a minimum of 2 hours. Gently squish out the excess water so they’re damp but not soaking wet and lay both skeins in the pan.
You can lay on plastic wrap to pop in the streamer or a food tray/pot in the oven. When the yarn is very hot, but not boiling, pull out and speckle with your salt shaker equally across both skeins, then mist with the citric acid water to fix speckles in place. Put back in the heat for 30 minutes to one hour so all dye is absorbed.
Dharma Trading: Purple Pop, Fluorescent Lemon, Fluorescent Safety Orange, Spearmint Breeze, Bright Aqua
Pro-Chem and Dye Washfast Acid: Hot Pink
Aljo: Lily Rose
I mix the salt and dye 50/50 by volume, not weight. This allows me to speckle and get a more uniform margin and diameter on the speckle by mixing it with salt. Very powdery dyes like fluorescent lemon or hot pink usually drop in a clump, not a speckle, and using the shakers gives me more uniformity on speckle size.
Conclusion: For a soft, watercolor diffusion of color, a non-superwash blend will give you that overmixed effect with lots of second and third tones between colors
Superwash on bottom, non-superwash on top
Superwash on the right, non-superwash on the left
Take your favorite superwash and non-superwash bases from Knomad and soak them in 2 gallons of warm water, a tablespoon of citric acid, and a teaspoon of synthrapol for a minimum of 2 hours. Gently squish out the excess water so they’re damp but not soaking wet and lay both skeins in the pan.
You can lay on plastic wrap to pop in the streamer or a food tray/pot in the oven. When the yarn is very hot, but not boiling, pull out and speckle with your salt shaker equally across both skeins, then mist with the citric acid water to fix speckles in place. Put back in the heat for 30 minutes to one hour so all dye is absorbed.
Dharma Trading: Purple Pop, Fluorescent Lemon, Fluorescent Safety Orange, Spearmint Breeze, Bright Aqua
Pro-Chem and Dye Washfast Acid: Hot Pink
Aljo: Lily Rose
I mix the salt and dye 50/50 by volume, not weight. This allows me to speckle and get a more uniform margin and diameter on the speckle by mixing it with salt. Very powdery dyes like fluorescent lemon or hot pink usually drop in a clump, not a speckle, and using the shakers gives me more uniformity on speckle size.
Conclusion: For a soft, watercolor diffusion of color, a non-superwash blend will give you that overmixed effect with lots of second and third tones between colors
Superwash on bottom, non-superwash on top
Superwash on the right, non-superwash on the left
 If you look closely at the photos, you can see the identical section of the skein that received the identical speckling and how different they look
For crisp, clean speckles with minimal back bleeding or color mixing, superwash will give you the color saturation and pops of color on a white background.
If you look closely at the photos, you can see the identical section of the skein that received the identical speckling and how different they look
For crisp, clean speckles with minimal back bleeding or color mixing, superwash will give you the color saturation and pops of color on a white background.
KETTLE DYE DIRECTIONS:
Dye Stock Recipe: 5 grams of dye, 1 tsp citric acid dissolved in 500 ml hot water for rainbow painting stock.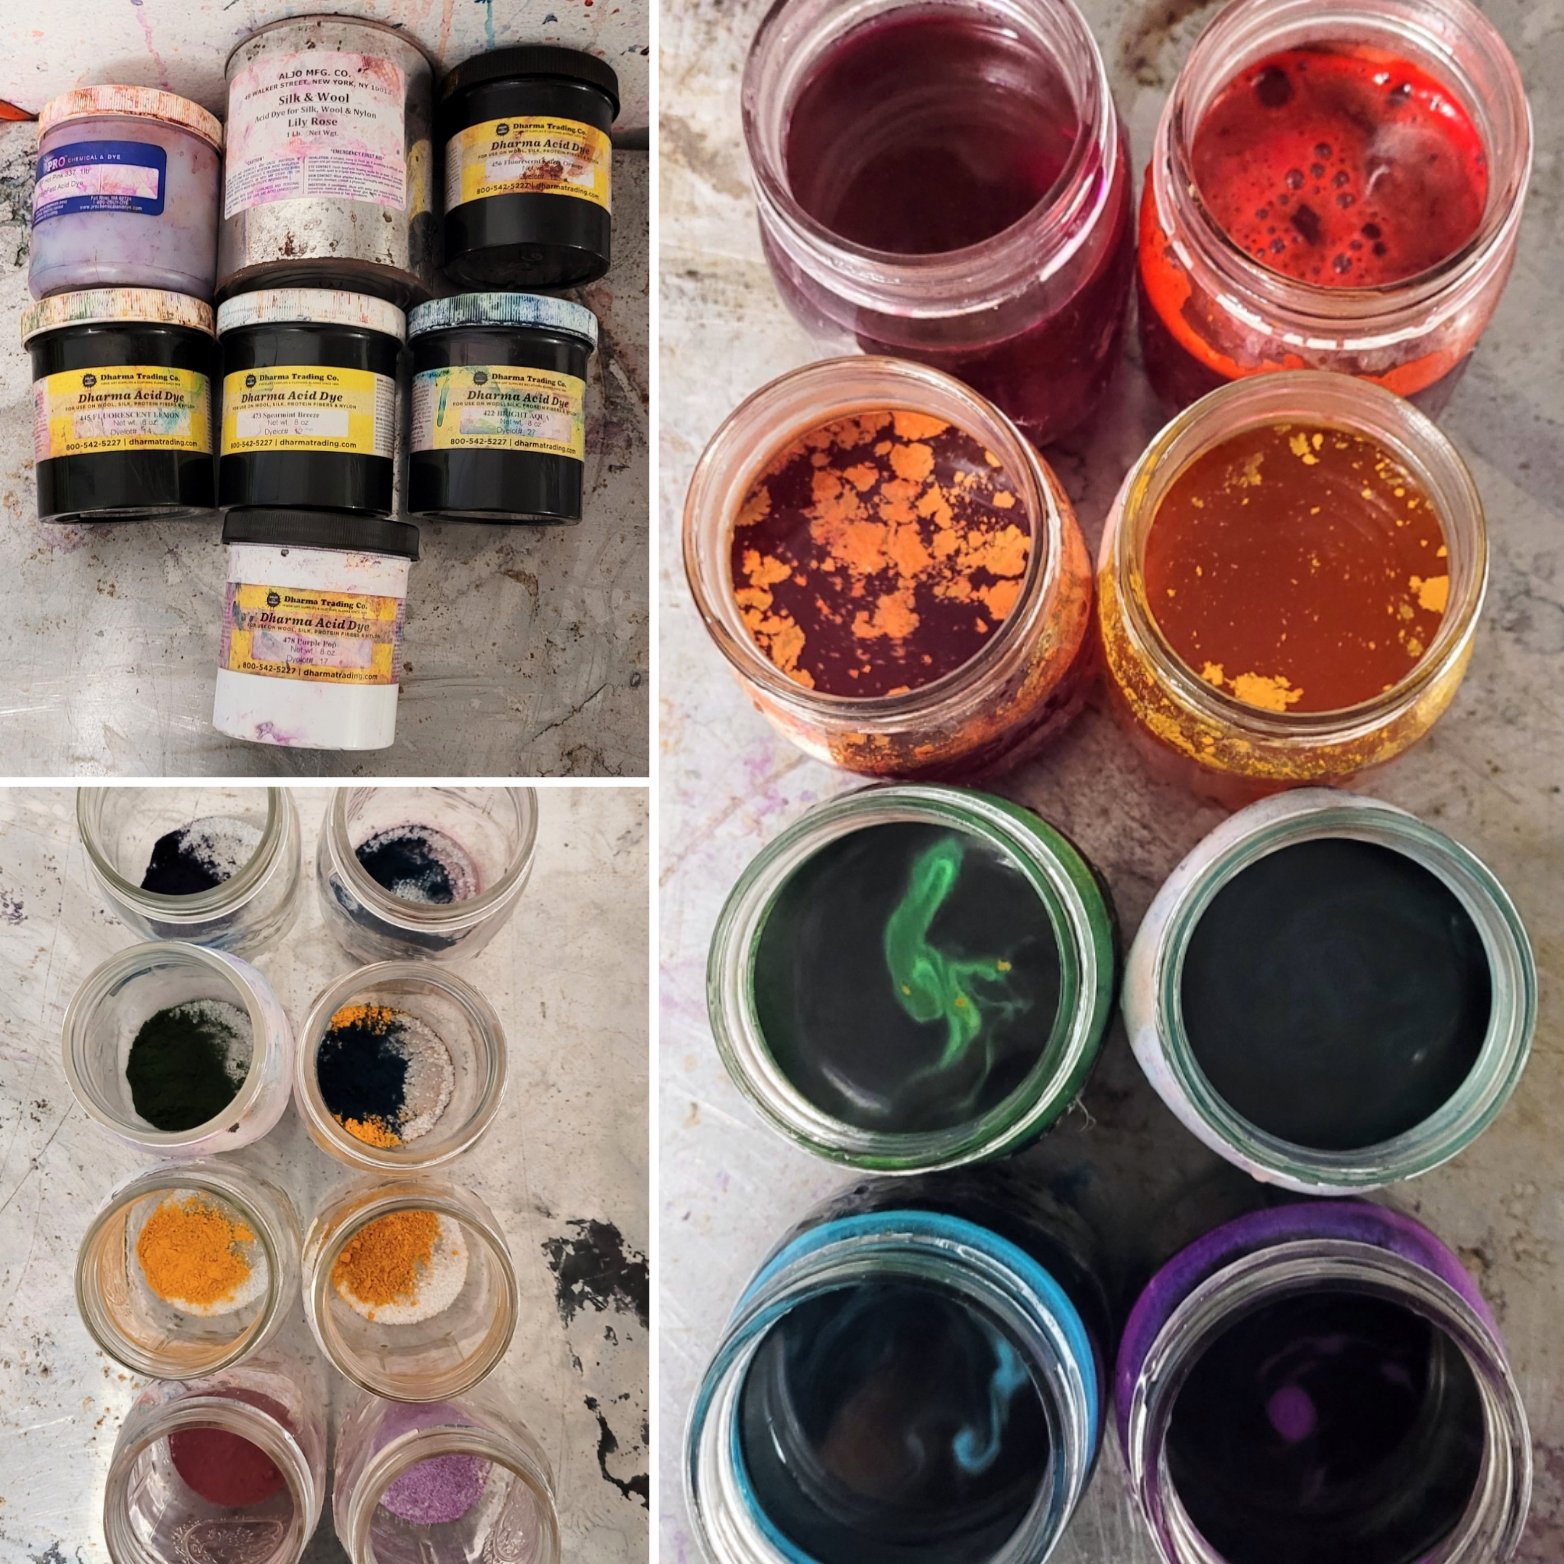 Take your favorite superwash and non-superwash bases from Knomad and soak them in 2 gallons of warm water, a tablespoon of citric acid, and a teaspoon of synthrapol for a minimum of 2 hours. Gently squish out the excess water so they’re damp but not soaking wet and lay both skeins in the pan.
You can lay on plastic wrap to pop in the streamer or a food tray/pot in the oven. When the yarn is very hot, but not boiling, pull out and paint colors in rainbow order, flip to the back side, repeat the color sequence, then speckle over the lighter sections and put back in the heat for 30 minutes to an hour.
Take your favorite superwash and non-superwash bases from Knomad and soak them in 2 gallons of warm water, a tablespoon of citric acid, and a teaspoon of synthrapol for a minimum of 2 hours. Gently squish out the excess water so they’re damp but not soaking wet and lay both skeins in the pan.
You can lay on plastic wrap to pop in the streamer or a food tray/pot in the oven. When the yarn is very hot, but not boiling, pull out and paint colors in rainbow order, flip to the back side, repeat the color sequence, then speckle over the lighter sections and put back in the heat for 30 minutes to an hour.
 Conclusion: Because non-superwash requires the yarn to be at temperature before the dye absorption process begins, the colors will blend and mix long before it actually starts adhering, leading to “muddier” colors and less optical saturation. For those that like a broken autumnal look and gentle color shifts between stitches, non-superwash will give you that effect.
For those that want maximum saturation and vibrancy with minimal overlapping of color at the margins, you will prefer the way superwash yarn absorbs dye on contact, before heat is applied. Approximately 60% of the dye adheres immediately and the remaining 40% when it is heat set. This is why the margins of the color are crisp and clear and remain where they were deposited.
non-superwash on Left - Superwash on the right
Conclusion: Because non-superwash requires the yarn to be at temperature before the dye absorption process begins, the colors will blend and mix long before it actually starts adhering, leading to “muddier” colors and less optical saturation. For those that like a broken autumnal look and gentle color shifts between stitches, non-superwash will give you that effect.
For those that want maximum saturation and vibrancy with minimal overlapping of color at the margins, you will prefer the way superwash yarn absorbs dye on contact, before heat is applied. Approximately 60% of the dye adheres immediately and the remaining 40% when it is heat set. This is why the margins of the color are crisp and clear and remain where they were deposited.
non-superwash on Left - Superwash on the right
 Non-superwash on the left, superwash on the right
 Notice how the non-superwash seems more “yellow/orange” and the greens are very tonal and diffused compared to the superwash?
 If you look closely at the photos, you can see the identical section of the skein that received the identical dye application and how differently they’re refracting color value.
To see more super-wash and non-superwash comparisons on resist dyeing check out the next post (part II).
If you look closely at the photos, you can see the identical section of the skein that received the identical dye application and how differently they’re refracting color value.
To see more super-wash and non-superwash comparisons on resist dyeing check out the next post (part II).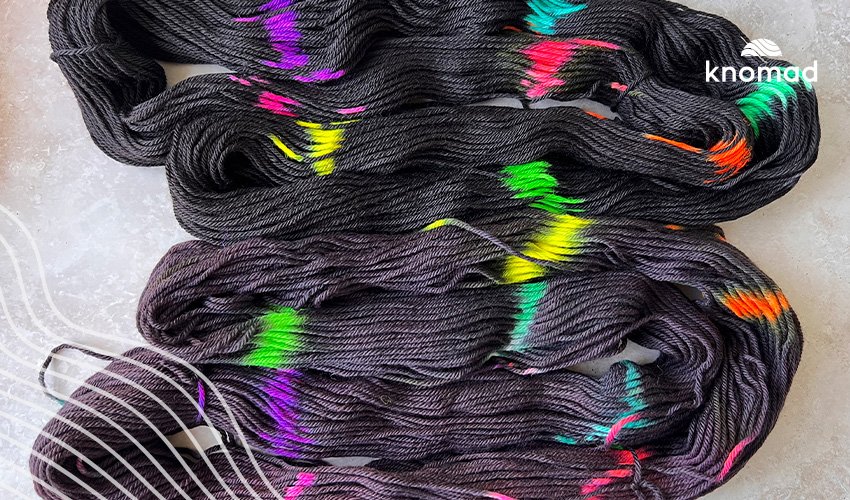
%20and...)