8 Ways to Kettle Dye Yarn (Part 1 of 2)
Have you ever wondered how to get a water color effect on yarn, and control the color flow down to the stitch? In today’s blog post, we’ll be looking at how the water table affects dye migration and how to use it to your advantage to achieve your desired result.
WHAT YOU WILL NEED:
- 2.5 inch deep stainless steel tray (found in restaurant supply stores)
- 1000 milileter measuring cup
- Acid Reactive Dye, colors used here are Hot Pink Washfast Acid from Prochem and dye, Flourescent Safety Orange, Fluorescent Lemon, Spearmint Breeze, Bright Aqua and Purple Pop from Dharma Trading Company. Feel free to substitute with whatever rainbow dyes you have from your favorite company.
- A Jewelers scale that weighs fractions of a gram
- A 60 ml luer lock syringe (easily found on Amazon)
- Citric Acid (white vinegar can be substituted but is not recommended)
- Your Favorite Knomad Yarn – 2 or 3 skeins per tray, no more no less
MIX YOUR DYE STOCK
2 grams of dye per 1000 ml of water and 1 Tablespoon citric acid or half a cup of white vinegar
Pour Over – High Water Table
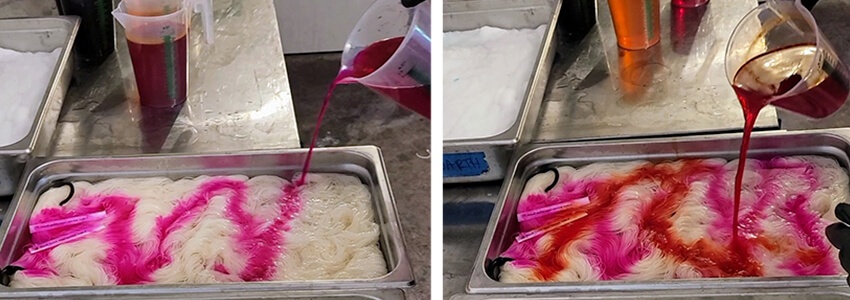
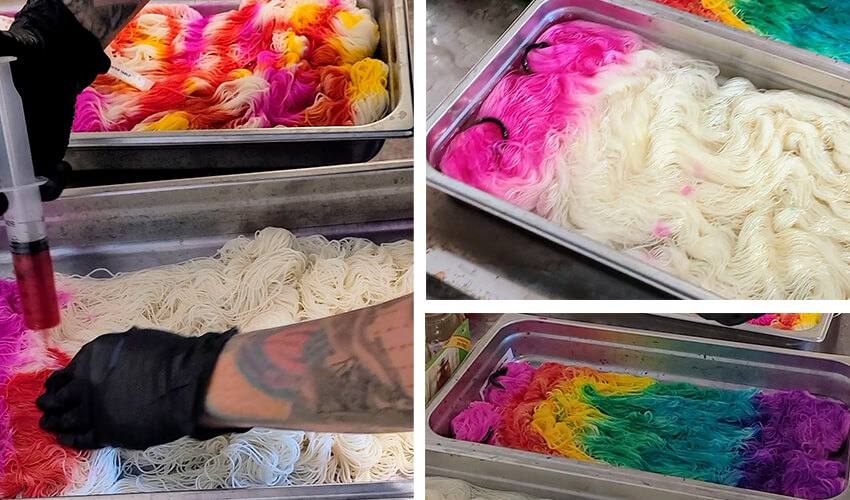
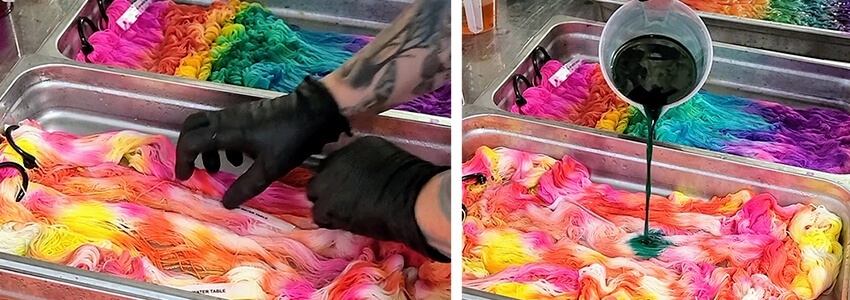
What is a water table? It refers to the amount of water in the dye bath. How much water you use affects how the dye migrates and blends throughout the skein. In this case, we will be using a “high water table” or enough water for the skeins to float off the bottom of the pan or about an inch of water. Start with the hot pink and drizzle back and forth across the pan from top to bottom.
Repeat the pattern crossing through the white space in the opposite direction with the orange.
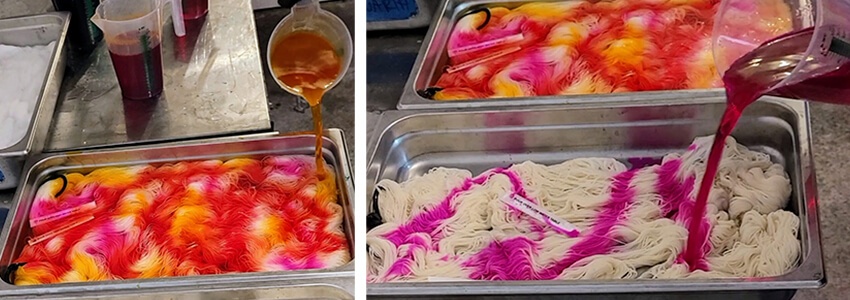
Drizzle the yellow over the remaining white spaces and put a lid on, bringing the heat up slowly until the dye bath is approximately 200 degrees for 30 minutes and cool to room temperature – Do not boil your yarn even if it’s superwash.
Pour Over Low Water Table
Now we are going to repeat the same process, but with damp skeins laid in the bottom of the pan without any extra water. This will give us more control over the dye migration and significantly brighter, more distinct colors than the high water table.
If you do not have an oven available (set at 200 degrees for 30 minutes) then you can lay the skeins on plastic wrap, fold up, and pop in a steamer basket for 30 minutes. Cool to room temperature.
Precise Application – low water table
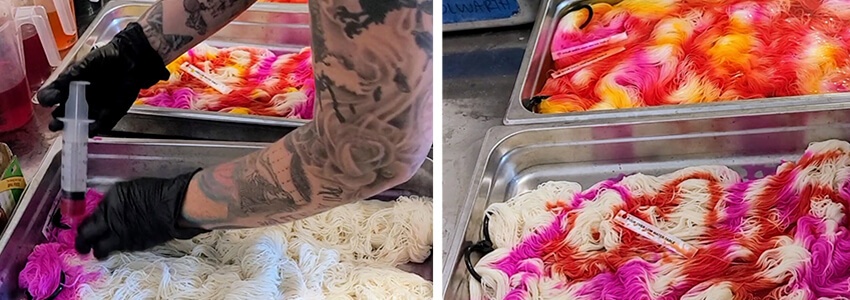
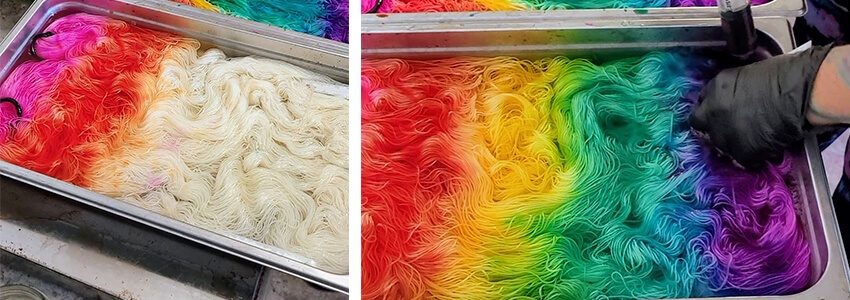
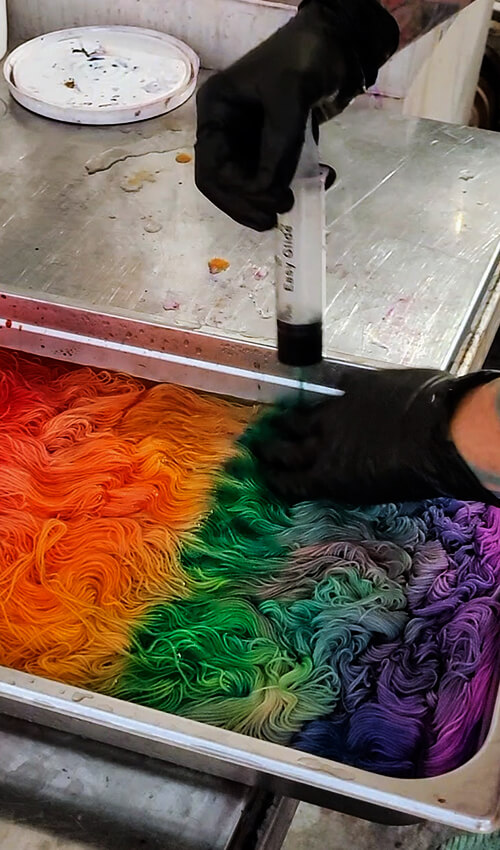
In the precise application technique, you will draw up 60 ml of pink dye and gently work it into the top of the skein, massaging the dye in as you go across for even penetration. If you only squirt the dye on without working it in simultaneously, you’ll have white patches in the middle of the skein that will ruin the effect.
Work the next color in, moving down 2 inches from the border of the pink and work the dye back towards the pink. If you squirt the orange dye directly at the line where the pink is, both colors will over mix and you won’t have a distinct line of color demarcation in your stitches.
Finish laying your colors in and heat set in the oven or steamer for 30 minutes, allowing to cool to room temperature.
Precise Application High Water Table
We will be utilizing the same method as above, but you’ll want to be careful that your water table does not get too high as you add the liquid dye stock. If you notice that the dye colors start migrating beyond where you placed them, pull the skeins gently to the side and draw up 60 ml of water and dump in the sink to keep it level. We want the dye to move freely – within the area we placed it. Approximately 60 ml of dye stock per color section was used here.
Continue adding your colors, making sure there’s no harsh edge to the color and that they flow nicely into one another
With all the dye stock added, your water table should look like this, with each color well blended at the margin but not overtaking and becoming one big brown mess. If you notice that starting to happen, your water table is too high.
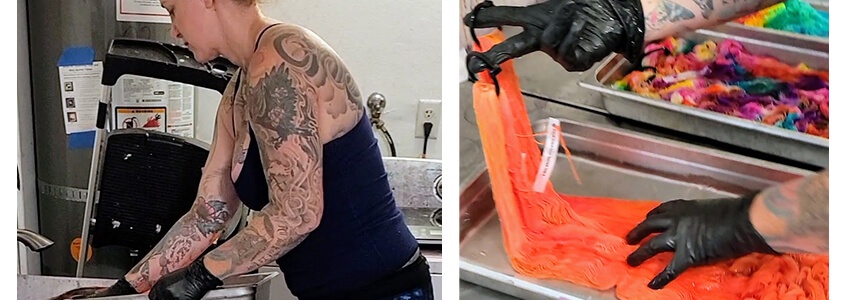
Once everything is heat set and cooled to room temperature, we’re going to flip our skeins, and add in any dye over white/pale spots on the back side.
Pour Over High Water Table on the Back Side
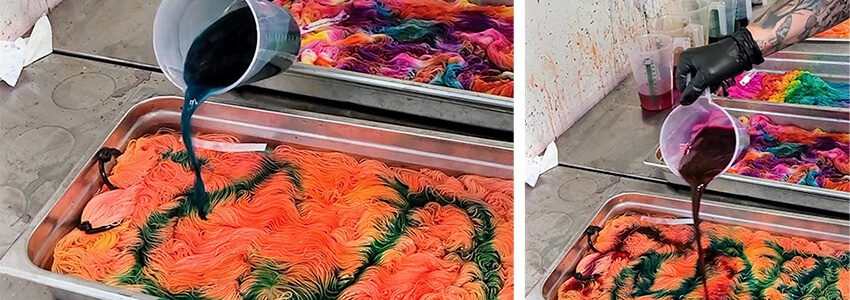
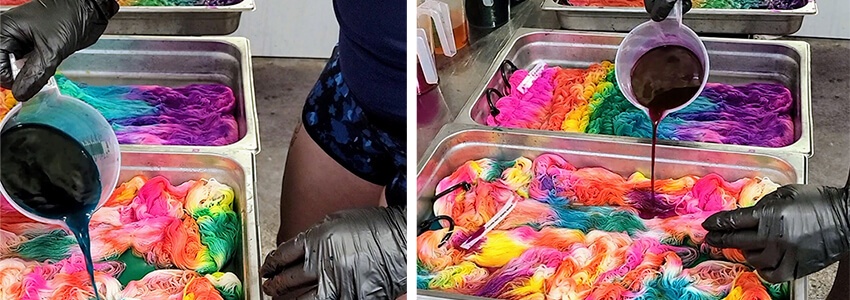
Notice how all the pink, orange and yellow dye completely overmixed on our high water table tray? While this creates a lovely low variegation tonal yarn, it doesn’t have quite enough distinction to create a proper neon rainbow yarn. Nevertheless, we will persevere in our technique by flipping these skeins and putting the green, blue and purple on the back side.
First, we need to pour off some of the water in equal proportion to the amount of liquid dye stock we’re about to add. I’d estimate between half a cup and a full cup.
Always make sure to keep your skeins neat and tidy in their pan. If they’re jumbled together and overlapping in spots, or the bulk of the skein is heavily squished to one side, you’ll have uneven dye application and skeins that don’t match. It’s not fun to join a new skein into a sweater that looks completely different, so always carefully arrange them when applying dye. That extra 30 seconds of attention leads to hours of knitting or crocheting enjoyment.
Now we repeat the pour pattern with the green. Notice how the green is interacting with the orange, dulling both colors? When you mix any color with it’s opposite, you end up getting more autumnal “earth” tones, which is a nice way of saying brown.
An interesting note about the way Dharma Trading mills the color Flourescent Safety Orange. I was told by their head dye tester that they simply mix the dye powder of Flourescent Fuscia with Flourescent Lemon. I believe they also do this with their Purple Pop color (pictured here) which is likely Flourescent Fuscia and Xtreme Blue. Hence, even though I’m mixing a mostly orange base with a green and a purple over the top, the finished yarn was not brown because of their component colors in the dye powder. Normally, this would yield unsavory results.
Pop back in the oven for another 30 minutes and cool to room temperature. Make sure to rinse thoroughly, as some of these colors bleed a bit.
Pour Over – Low Water Table
Make sure to flip your skeins on their back side because we want to fill up all the white space with color. I don’t think there’s anything sloppier than a bright, colorful skein with gaping white patches in it – it rarely looks cute in the finished knit/crochet.
I will literally peel a skein apart hunting for the dreaded white patches. Nothing ruins the soft cloudlike rainbow color transitions like 2 or 3 bone white stitches every repeat.
Now we fill up those spaces with some dye! Use discretion here – if you’re in an orange section, try yellow instead of blue or purple. If you want equal color representation, then carefully assess how much white space you have and try to keep the amount of green, blue and purple you pack in equal. Remember, we’re trying to make a yarn that knits up beautifully. Not just a pretty skein. Pretty skeins are not hard to make, so reverse engineering your dye job to match the project you’re making is key to having a skein that translates beautifully into a garment.
While I’m demonstrating the pour over technique, I personally prefer using a syringe, as I like the control it gives me. But since many dyers utilize the randomness of the pour over, I thought I’d demonstrate both side by side so you could make an informed choice about which technique yields the result you’re looking for.
Precise Application – Low Water Table on the Back Side
See how much white we have on the back of the skeins? Always flip them! Occasionally you can dye both the back and the front in one pass, but I find that with high variegation full rainbow skeins, it’s better to heat set each side so you don’t get purple dripping all over your orange and creating unintentional brown patches. Fill in the gaps in color order and heat set for 30 minutes.
Precise Application High Water Table on the Back Side
As you can see, the yellow and orange are pretty heavily overmixed due to the high water table, and some of the green has migrated towards the purple, giving some third and fourth color tones. We could call this “muddy” or we could call this “painterly” for those that enjoy a bit of overblended colors.
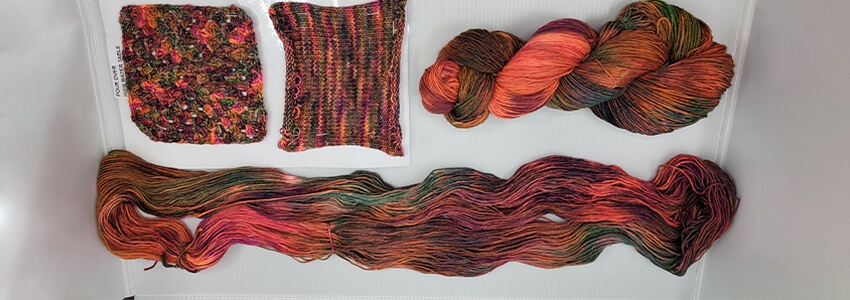
Now to the best part – knit and crochet swatches so we can see how the various dye application styles translates!
Pour Over – High Water Table
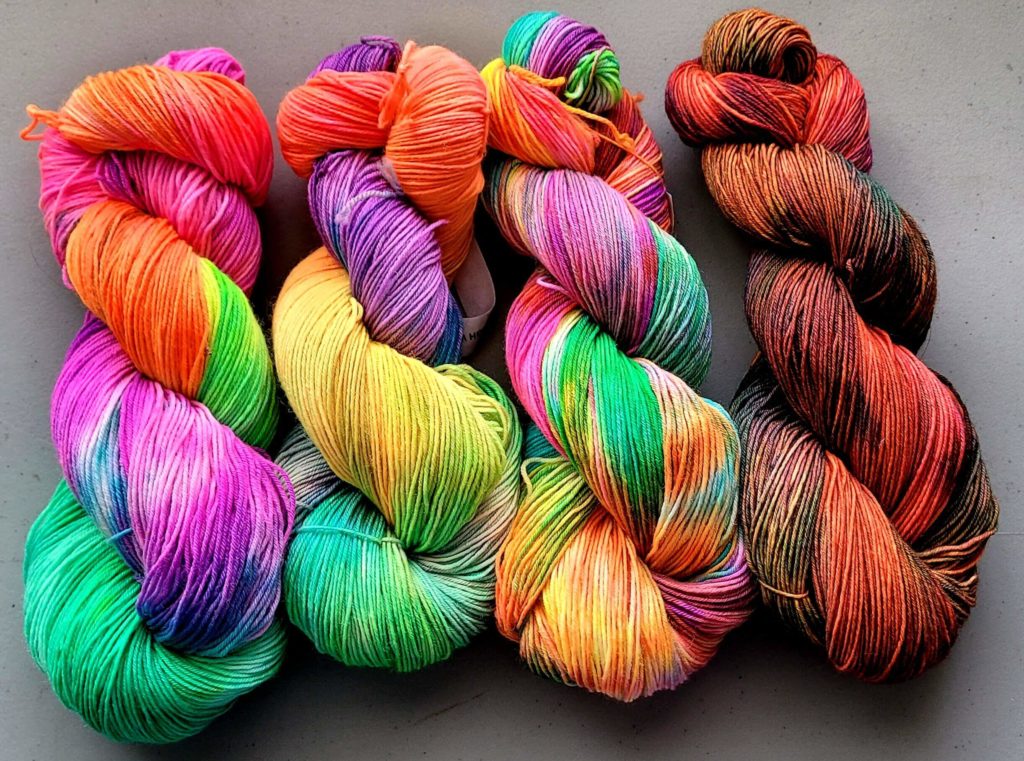
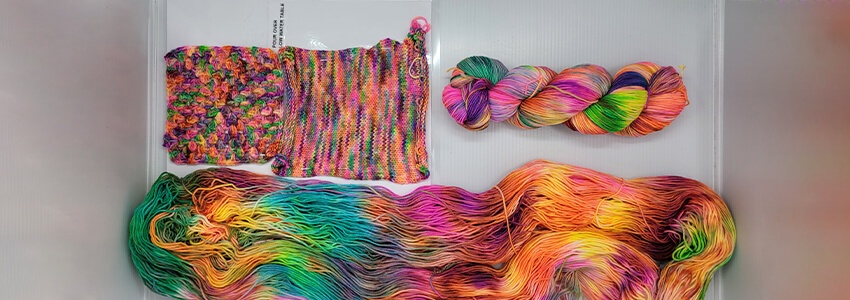
This skein skews heavily towards orange and green. This is not unexpected, considering the dye was layered with a lot of water that allowed the color to migrate far and wide. So we are missing the pink and yellow (they turned solid orange) and the green/blue/purple gave us mostly teal green tones. The pop of the neon colors has been very subdued by the over mixing, giving us a lower variegation autumnal colorway. This technique is great for those that like surprises and experiments, but for control freaks like me with a razor thin margin of “acceptable outcome” this is a rarely utilized technique. I prefer using it for colors of the same family, like all greens or yellow to green, green to blue etc.
Pour Over Low Water Table
I love the way this yarn looks in the skein, but I don’t think it translates as well into the knit swatch. The quick color changes translate to some (rather unfortunate) demi-pooling, and the orange shaded purple is too dark. The crochet swatch looks similarly “garbled.” This might look great in a chevron stitch or woven, but it’s not well suited to stockinette in my opinion.
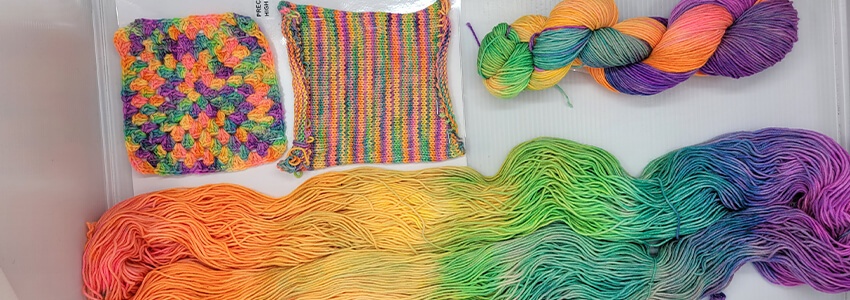
Precise Painting High Water Table
The precise painting has yielded much more color placement control, but where we see the action of the water table here is how blended the pink is, into the orange, yellow, green, blue and purple. No harsh lines and you can see a nice back and forth color story in both swatches. I personally find the colors just a bit too muted for my taste, as I like at least one of the neons to POP and create a more dynamic fabric. But this is lovely as a fringe on a piece, or stranded colorwork on a sweater with a solid shade background.
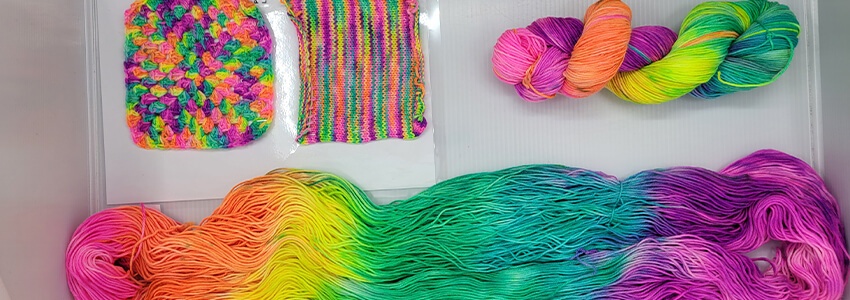
Precise Painting – Low Water Table
This right here is my favorite! Nice and bright, distinct color transitions, kaleidoscope effect in the crochet swatch and equal color representation. This technique is great when you want high contrast, high variegation yarns and you’re using a lot of color that you want to remain pure. Notice how the pink at the top of the high water sample disappeared, but here it’s clear and distinct?
Look out for the next installation of Kettle Dyeing with Frost Yarn on this blog, where we examine 4 other techniques and talk about how you can mix and match to get exactly the hue and color flow you’re looking for when dyeing for a specific project!




Very very usefull article. Thank you Nicole for this wondeful dying course and all your hard work.
So glad to hear this!❤️❤️ Tag us in your projects using #knomadyarn
Thank you for all of your helpful tips! When is your part 2 of 2 coming out? I cannot wait.
Thank you so much very, very helpful for this newbie!
Great set of instructions, I loved all the pictures. Nicole does such a through job. I dye yarn infrequently since I run a business and time to do relaxing hobbies is almost impossible. Since I am a bight yarn type of girl I am eager to find time to try Nicole’s low water table instructions.
I hope we see more of her work and instructions.
I really enjoyed this blog in addition to your videos online. I have some Knomad yarn, you are inspiring me to hit 5he dyes pots!