Henry Lauren Moran
Posted on: SuperwashMarch 6, 2025
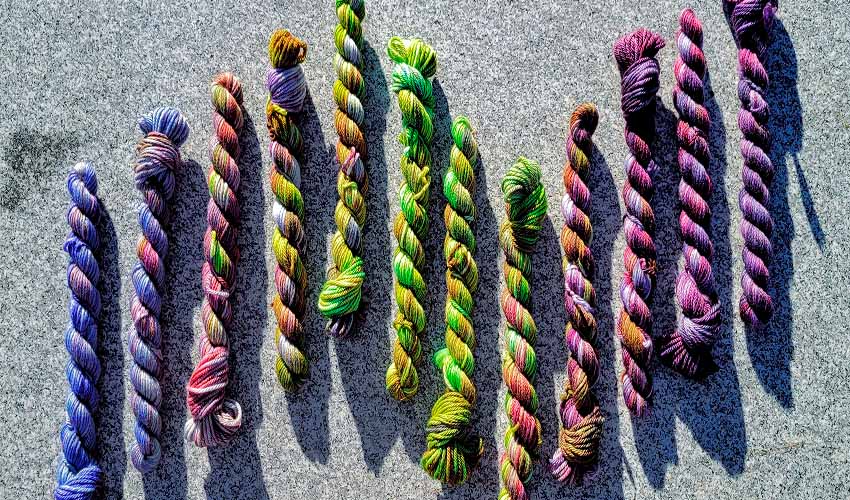
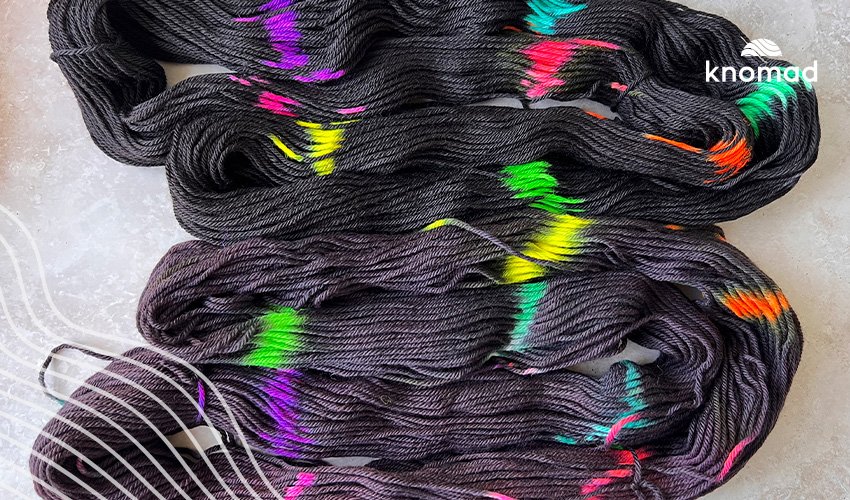
One Pan Advent Minis with Votive DK

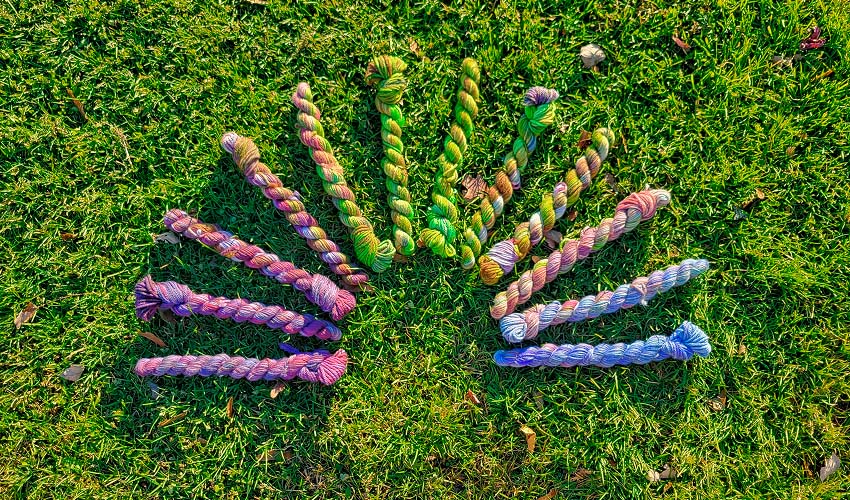
Mini skeins. If you’ve ever dyed them, you know that they typically involve a lot of work. It’s as much measuring, dyeing, heating, and setting as a regular skein, with 20% as much end product to show for your labor. Then you have to consider that most minis are being dyed as part of a set of five, eight, twelve… pick a number. Oof. But as a shopper, I LOVE mini skeins, especially as sets. They’re fun, they’re great for colorwork, they make wonderful gifts, and I can enjoy a whole collection of colorways for a fraction of the price.
Well, reader, I have good news. Through trial and error, I have developed a way to dye an entire 12 color mini skein set in ONE pan. One pan? One pan. It’s the only way I’ll be dyeing minis from this day forward. All the fun, a fraction of the time and effort, and incidentally, a perfect handmade advent gift for your very best yarn buddies.
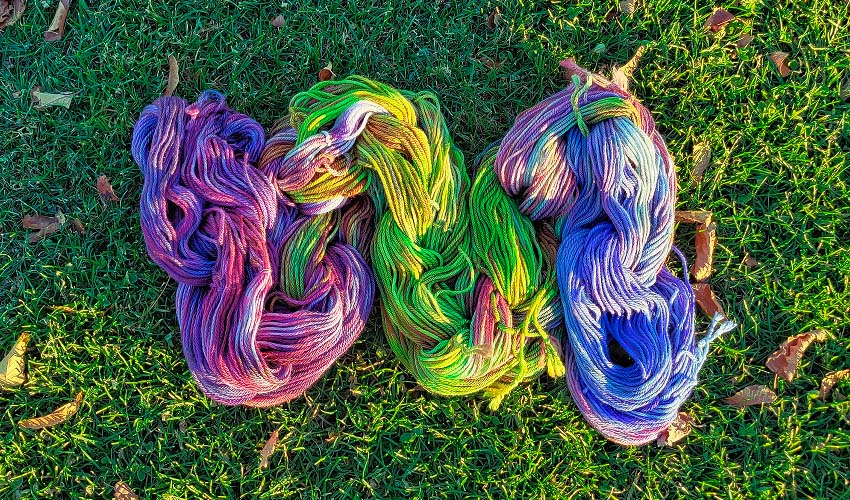
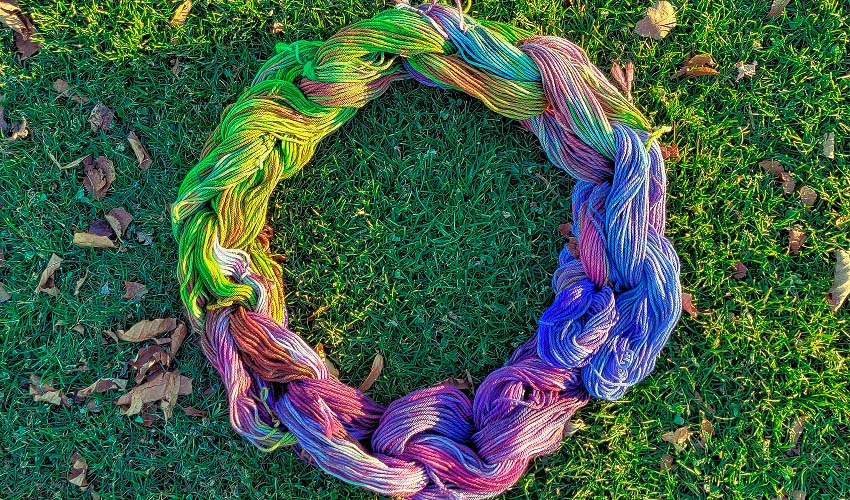
The idea is to essentially fingerpaint a rainbow of color by sprinkling and smudging dry dye directly onto your wet minis. It’s a precision operation, but the payoff is totally worth it, and you can get two sets out of a 25 skein bag. We’ll be taking color inspiration from the Aurora Borealis.
For this project we’ll be using 12 skeins of Votive DK 20g minis, a blend of 80% 19 micron extra fine superwash merino wool, 10% luxurious cashmere, and 10% recycled nylon. These are ideal minis for gifting, as they’re extra soft thanks to the 19 micron wool, durable due to the nylon, and a little extra special thanks to that touch of cashmere. You can use these minis for DK socks, with a solid color for a colorwork sweater, or on their own as a color-shifting cowl.
Materials:
- 1 x 4” full hotel pan (also called chafing dishes)
- 1 x dedicated dye tongs
- 1 x dedicated dye spoon
- Gloves (I recommend lots of dry, disposable gloves for this one)
- 1 x particulate mask (a respirator is preferable if available, but a disposable mask will do)
- 6 x black zip ties (or your preferred skein management tool)
- Dharma Acid Dyes:
- #409 Dark Navy
- #420 Golden Straw
- #422 Bright Aqua
- #436 Twilight Grey
- #448 Chartreuse
- #459 Intense Iris
- #464 Hyacinth
- #472 Blued Steel
- #473 Spearmint Breeze
- #477 Cherry Bomb
- #479 Radioactive
- #482 Delphinium Blue
- 12 x Knomad Votive DK Mini Skeins
- Citric Acid
- Wool wash or dish soap
- Paper towels or a white cotton rag
- Inspiration photo (it will help with dye placement & color selection!)
- OPTIONAL: Hotel pan lid (you can get by without them, just keep an eye on your water level and be prepared for your kitchen to get humid!)
- OPTIONAL: 1 or 2 dedicated dye buckets for soaking and washing
- OPTIONAL: Dye rags – you won’t see them in these instructions, but they’re good to have on hand!
Yarn Prep:
Needed: yarn, zip ties
Optional: presoak bucket
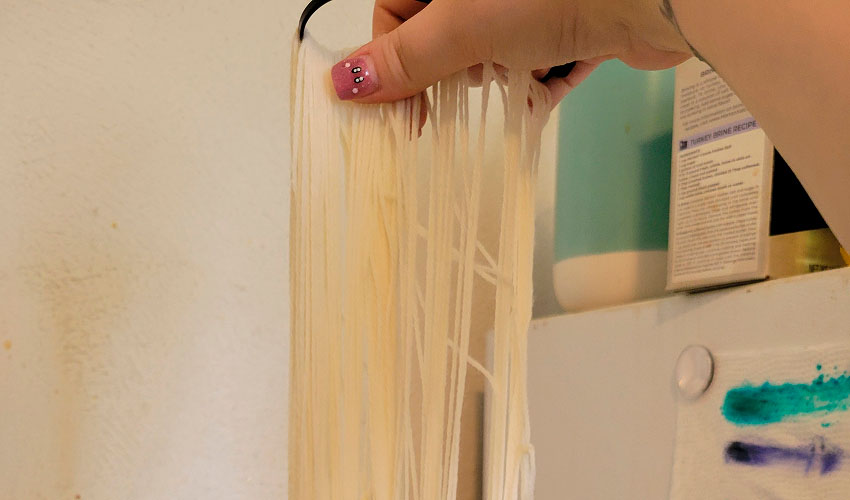
- Open your skeins and secure two skeins on each ziptie as loosely as possible. PRO TIP: Choose black or colored zip ties over clear or white. They will be easier to spot in the dye pans; clear and white will pick up the dye color and blend in.
- Presoak your bare yarn in cool to lukewarm water for twenty minutes to an hour. I usually soak my yarn in a bucket in the bathtub, but you could also use your sink.
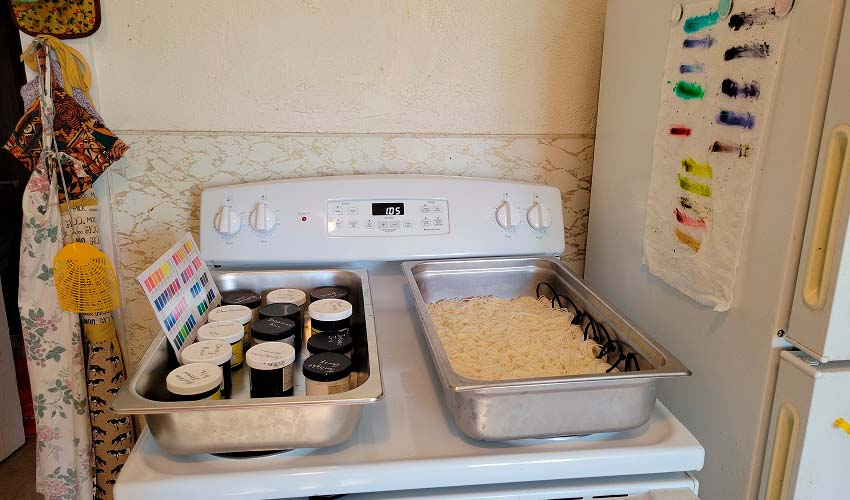
Dye Set-up:
Needed: Inspiration photo, pan, damp paper towels or white rag, dye, gloves, mask
NOTE: I am not exaggerating when I say that an inspiration image is the difference between failure and success in this project. It’s going to inform your color choices, where you place your dye, and how much dye you use. If you want to choose your own inspo image (or even draw one) that works better with the colors you have, go for it! But I’d suggest that you be mindful to choose a picture that includes light and dark areas, multiple colors, and most crucially, features colors that move diagonally across the canvas. This is going to get you 12 skeins in fun colors that look right together without looking exactly the same. The aurora borealis just so happens to fit all of these criteria perfectly, plus it’s wintery and gorgeous!
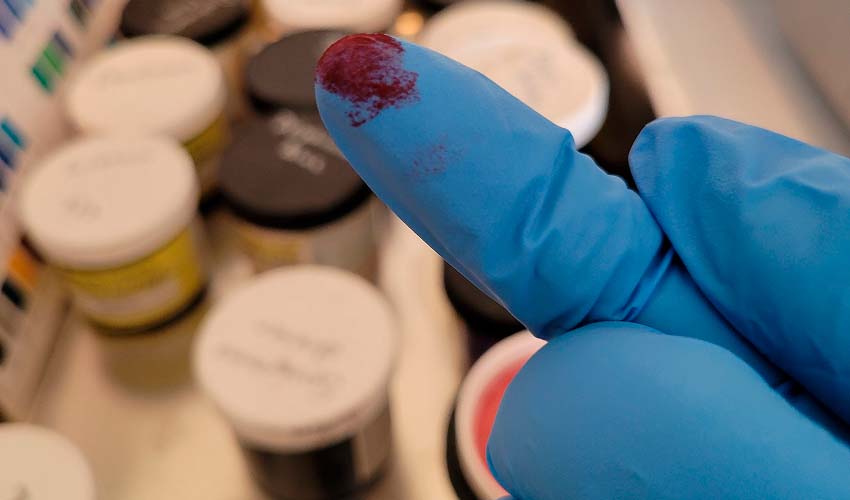
The next most important step is swatching your dyes. In order to get this done using just ONE pan, we’re using raw powdered dye directly on damp yarn. Pigments behave differently when dyed this way, and may split or even look like completely different colors than they usually do. Skipping the swatch step would be like coloring with unlabeled markers, and likely end in a mess, so definitely don’t skip this step.
Okay, spiel over, let’s get on with it!
- Put your inspiration image where you can see it as you work. I opened mine up on my phone and set it next to me on the table.
- Dampen your paper towel or white rag and set it inside your dye pan.
- Put on gloves and your mask.
- Set up your dyes (or prospective dyes) in an accessible place where you can read the labels easily. I’ve set mine up in one of my other dye pans on the other side of the stove.
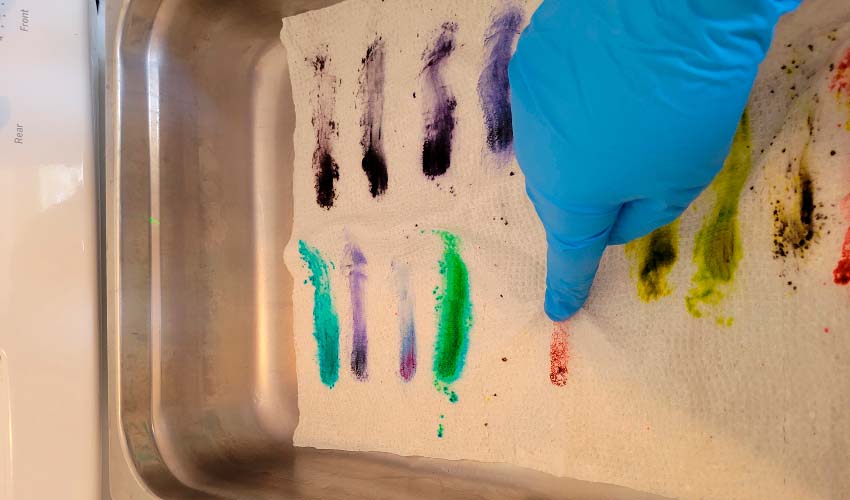
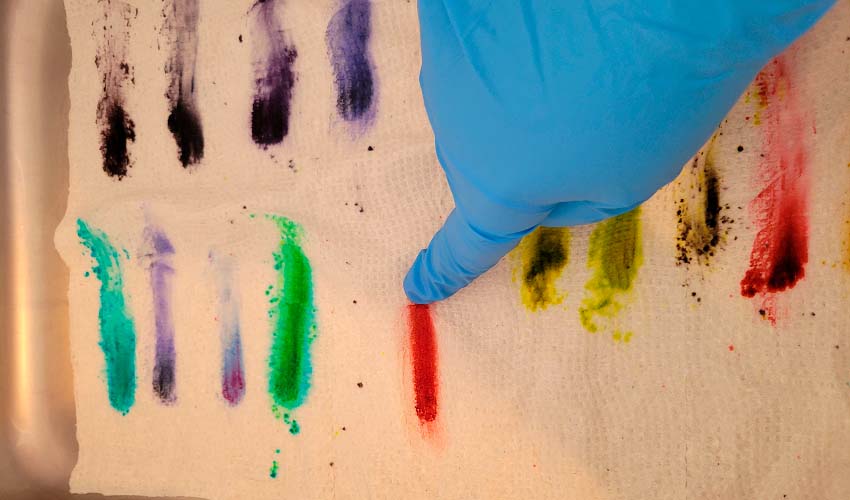
- Swatch your dyes:
- Open up four or five dye containers at a time to keep things organized
- Tap the very end of a clean, gloved finger into one dye
-
- Swipe your finger back and forth over the towel a few times
-
- Repeat with each dye you are considering using, changing gloves as needed to avoid contaminating your colors and getting a false swatch. You shouldn’t be dipping any of your fingers more than once per glove!
- Pro Tip: apply your dyes to your swatch towel in the same order as your dyes are set up, and don’t move them! It’s a lot easier than trying to write labels on a wet towel.
- If you don’t like how a particular dye swatches, remove it from your lineup or replace it with something else. You’ll likely be able to get the colors on your yarn a tiny bit lighter by manipulating it in the pan, but not much. If you do make changes to your color choices, I’d recommend doing a completely new swatch towel to avoid confusion.
 Dyeing:
Needed: 4” hotel pan and lid, spoon, tongs, dye, yarn, gloves, mask, soap
Optional: wash and rinse buckets, dry rags or paper towels
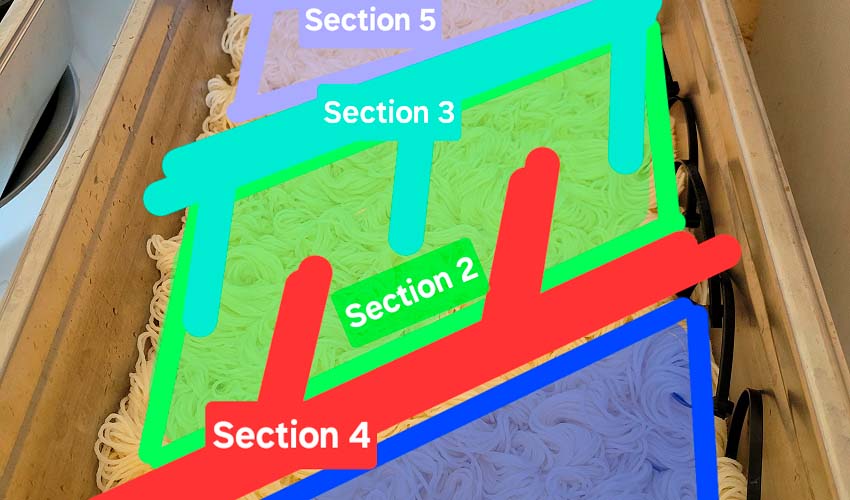
NOTE: For the sake of clarity, I’m going to be referring to areas in the pan according to the diagram below. These sections represent where I’ve placed specific dye colors and in what order to get the desired effect.
Plan on changing gloves often. I changed my gloves each time I got them wet, and any time I changed sections. To reduce waste, when using multiple colors in one section, I wiped my gloved fingers thoroughly on dry paper towels between colors to remove as much dye as possible. If you decide not to change gloves after getting them wet, dry them as much as possible – you never want to put wet gloves in your dry dye!
- Put your inspo image and swatch towel up where you can see them. I kept my phone nearby with the picture pulled up, and I used magnets to stick my swatch towel on the fridge next to the stove.
- Set your hotel pan and dyes up at your workstation. We won’t be using heat until after all of the dyeing is done, so feel free to work on the countertop or an easy-to-clean table.
- Lay your pre-soaked skeins horizontally into your pan, ensuring that yarn is distributed evenly and that as much yarn is exposed as possible.
- Add just enough water to the pan to keep your skeins wet throughout the dyeing process. I used about three cups.
- Put on a pair of clean gloves and a particulate mask or respirator.
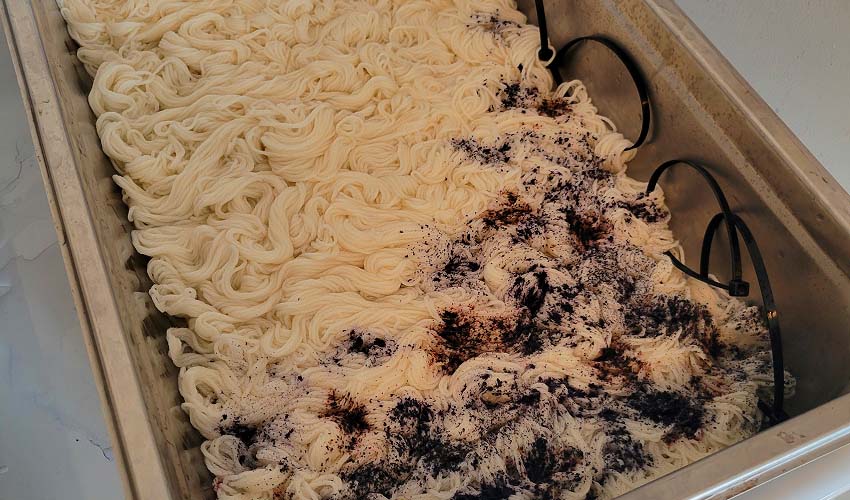
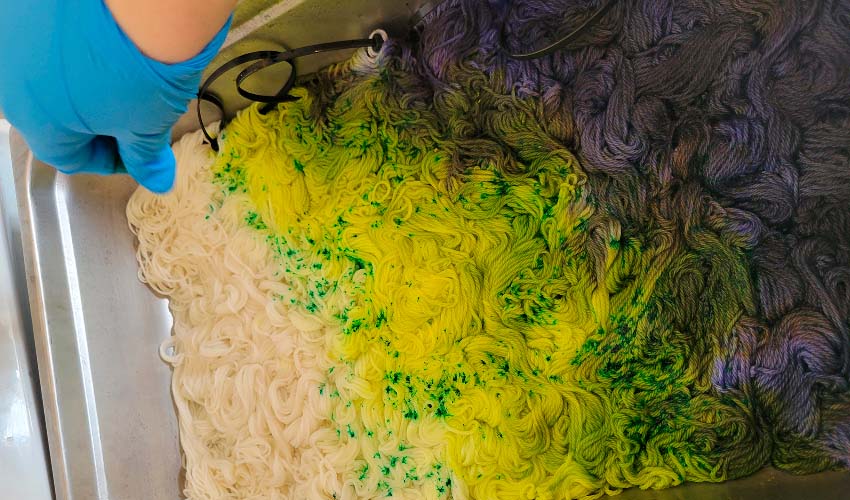
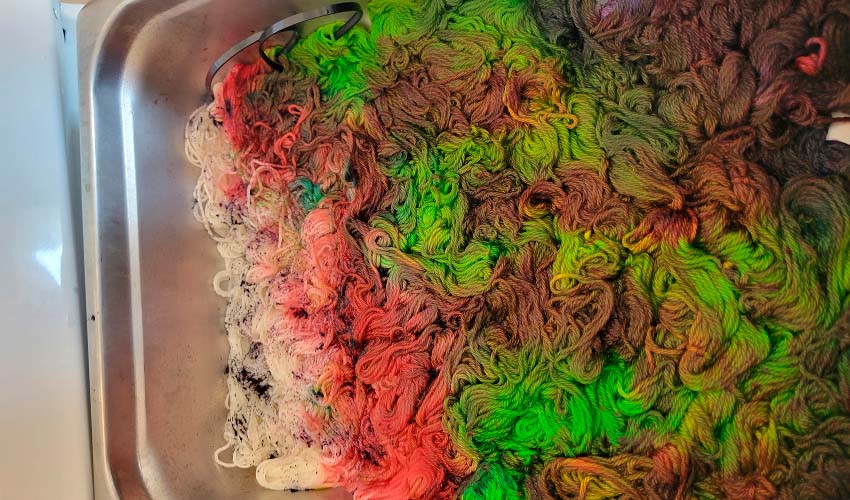
- Section One:
- Dyes: Blued Steel, Dark Navy, Intense Iris, Twilight Grey
- Sprinkle dye sparingly throughout the section in small “dots”. Be very careful not to use too much dye or to overlap colors – you only need twelve or so dots of dye to start.
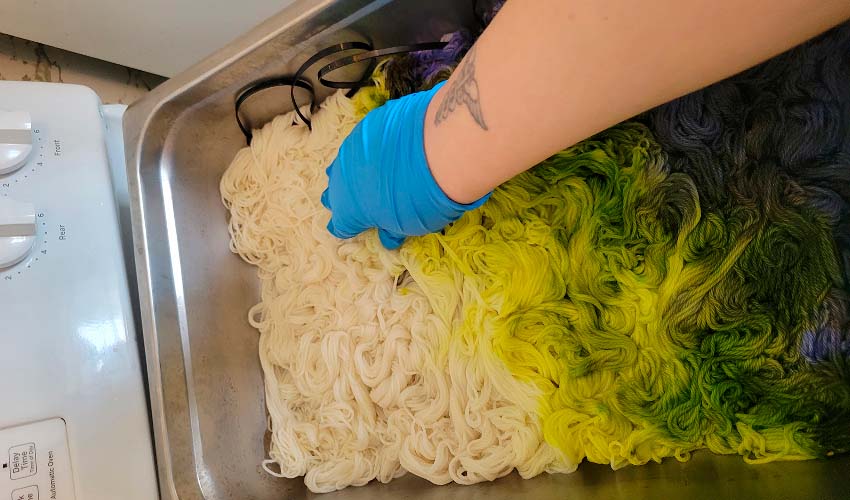
- Once you’ve finished putting dye down, use your gloved fingers to “massage” the dye into the yarn. You can squeeze to help the dye penetrate to the back, move your skeins around to expose white areas, and even “wipe” the dye across the yarn. You’re pretty much finger painting, so be creative with your hands and have fun!
- Repeat dye application and “yarn massage” until you’re happy with the saturation of color. Leave some lighter areas if you can – you can always go back over them later, but leaving light spots now gives you some options to change things up as you go!
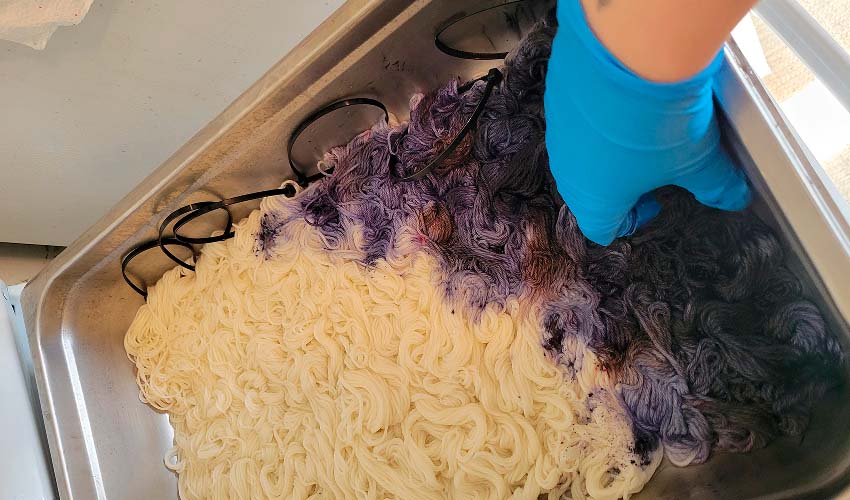
- Section 2:
- Dyes: Chartreuse, Radioactive
- Sprinkle dye sparingly throughout the section in dots, being mindful to leave some white space between Section 2 and Section 1. Radioactive is a fluorescent dye that delivers a neon pop of color, while Chartreuse is slightly more subdued, so put some thought into which color you place where. I chose to concentrate more Radioactive at the top of Section 2, where I planned to add in some Bright Aqua later.
- As with Section 1, use your gloved fingers to “massage” the dye into the yarn. I elected to do more swiping motions in this area in order to mimic the way the northern lights look in the sky.
- Repeat dye application and “yarn massage” until you’re happy with the saturation of color, being mindful to leave some lighter areas in case you’d like to make adjustments later.

- Section 3:
- Dyes: Spearmint Breeze, Bright Aqua
- Sprinkle dyes sparingly in a line above Section 2 and massage into the yarn to make a visible “stripe.”
- Sprinkle dots of Spearmint Breeze and Bright Aqua down into the top of Section 2 to look like waves in the aurora. Massage the dye into the yarn, adding more if you like.
- Repeat dye application and “yarn massage” until you’re happy with the saturation of color, being mindful to leave some lighter areas in case you’d like to make adjustments later.
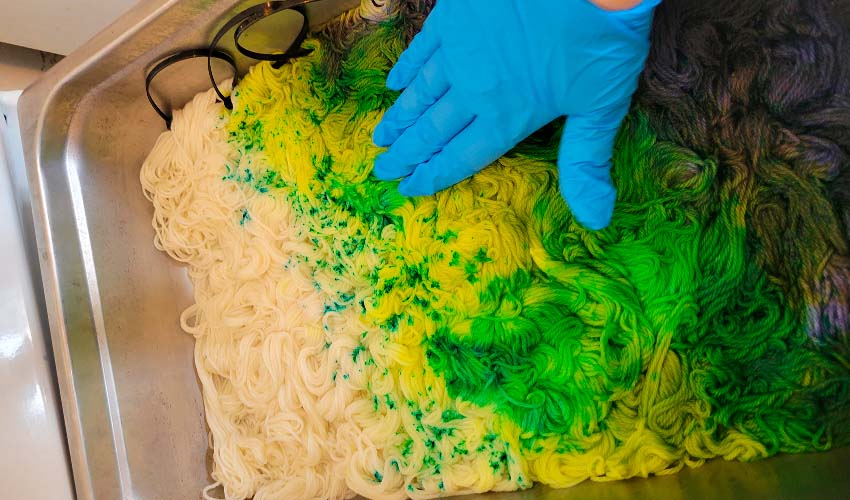
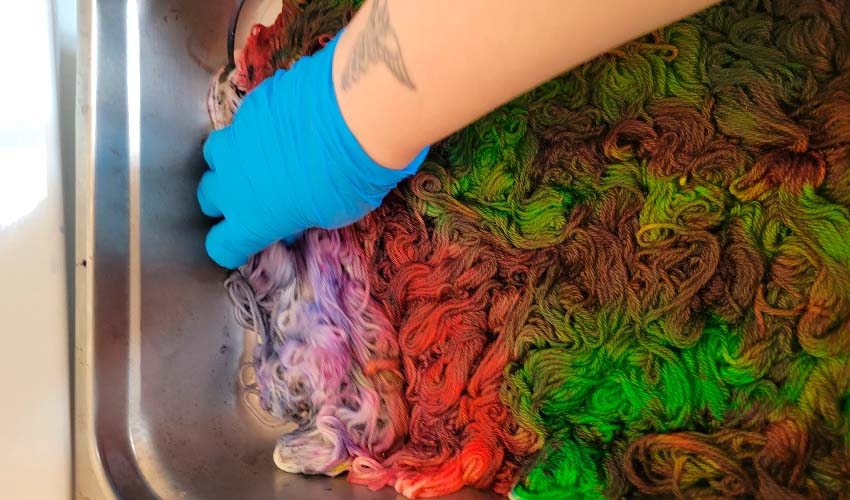
- Section 4:
- Dye: Cherry Bomb
- Sprinkle dye sparingly in a line below Section 2 and massage into the yarn to make a visible “stripe.”
- Sprinkle a few dots of dye into the light/white places of Section 2 and push the dye carefully into the yarn. Be very mindful not to use too much dye or move it around too much in this step – we don’t want to make mud, just create some areas of visual interest and introduce some of that beautiful red shade that you see in the aurora.
- Repeat dye application and “yarn massage” until you’re happy with the saturation of color, being mindful to leave some lighter areas in case you’d like to make adjustments later.
- I elected to add a bit of cherry bomb at the top of section 3 during this step as well, so if you’d like a perfect recreation, go ahead and sprinkle a little dye there too.
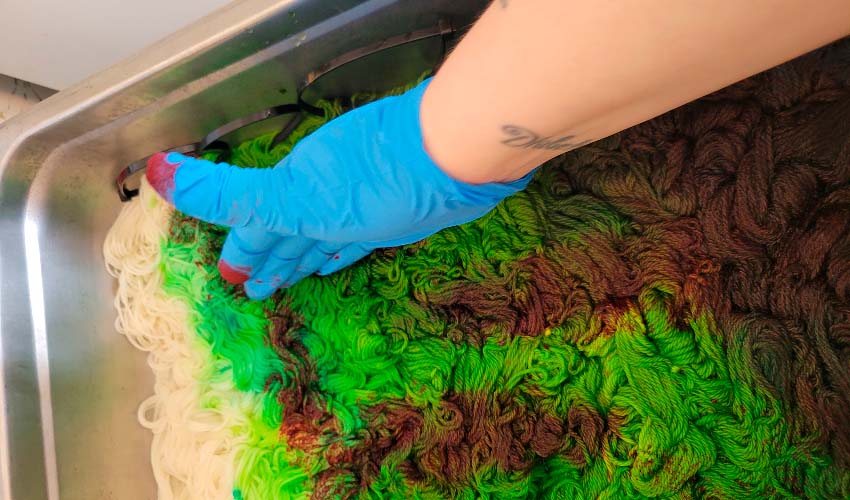
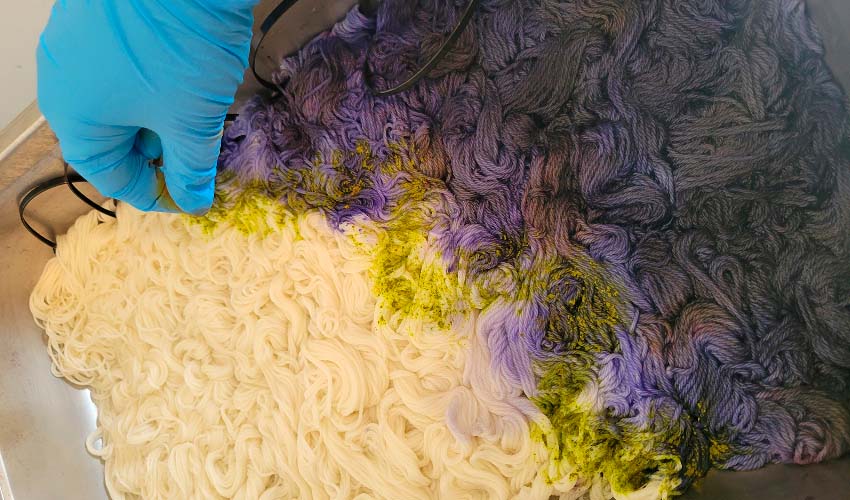
- Section 5:
- Dyes: Hyacinth, Delphinium Blue, Blue Aqua
- Sprinkle dye sparingly in small dots throughout Section 5 and massage into the yarn.
- Repeat dye application and “yarn massage” until you’re happy with the saturation of color, being mindful to leave some lighter areas in case you’d like to make adjustments later.
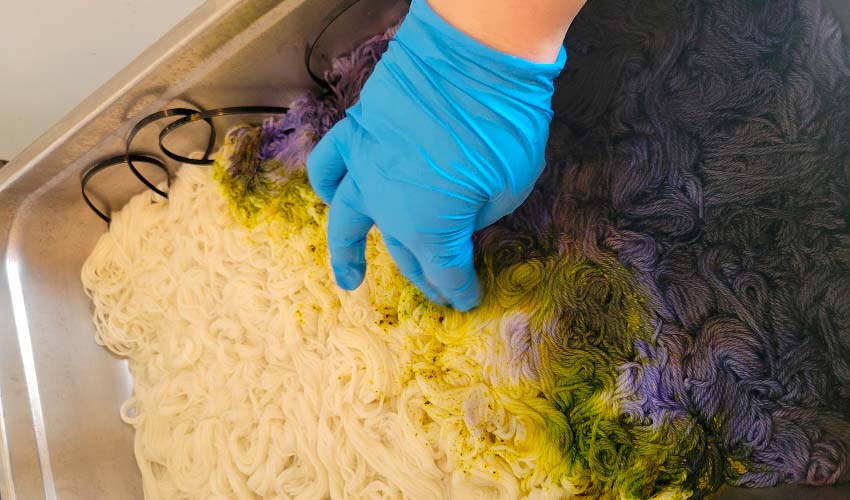
- Finishing Touches
- Dyes: All (including Golden Straw)
- Check throughout your skeins for areas of bare yarn and add color according to section.
- Add dye however you like to undersaturated areas. I chose to add some Spearmint Breeze to the top of Section 2, a few spots of Cherry Bomb to Section 5, and lots of Cherry Bomb to underdyed areas of Section 1. I also added more Radioactive to Section 2 to give it a little more punch. I then took Golden Straw and added it to any white left in the pan, to mimic the golden color you sometimes see on the horizon at dawn and dusk.
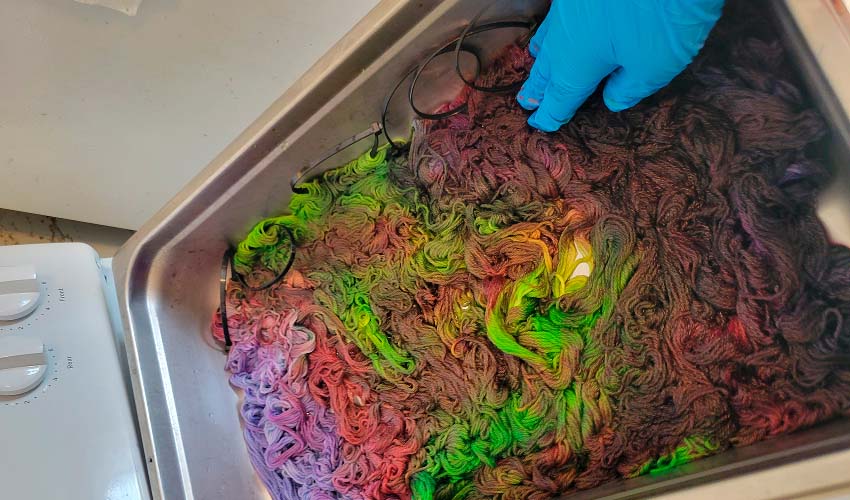
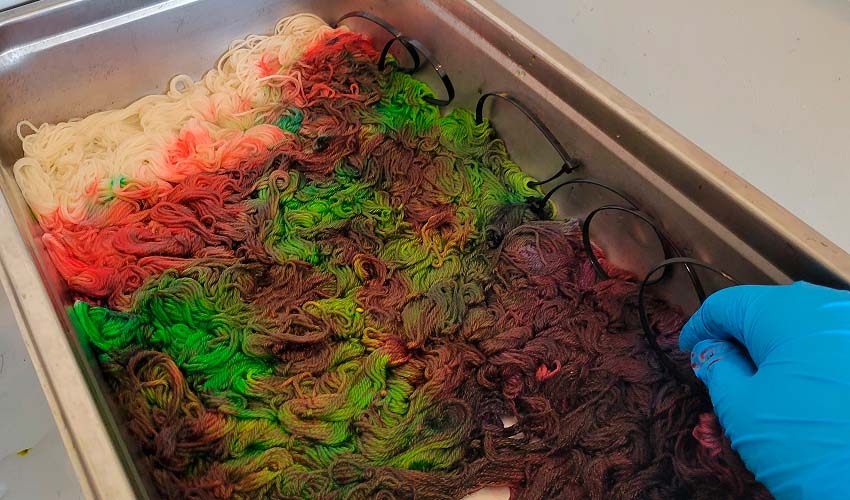
- After you have completely finished adding dye, sprinkle a few tablespoons of citric acid evenly and liberally over your yarn and allow it to sit for about an hour. This helps the yarn absorb the dye exactly where it’s placed. Do not skip this step!
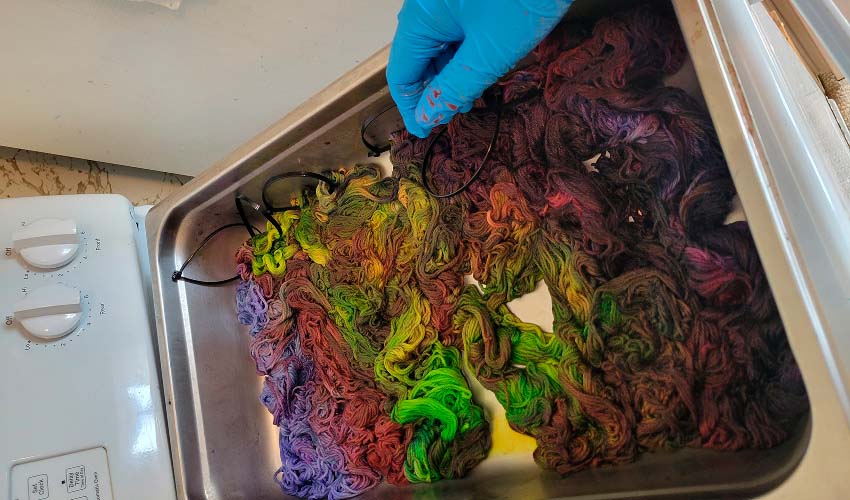
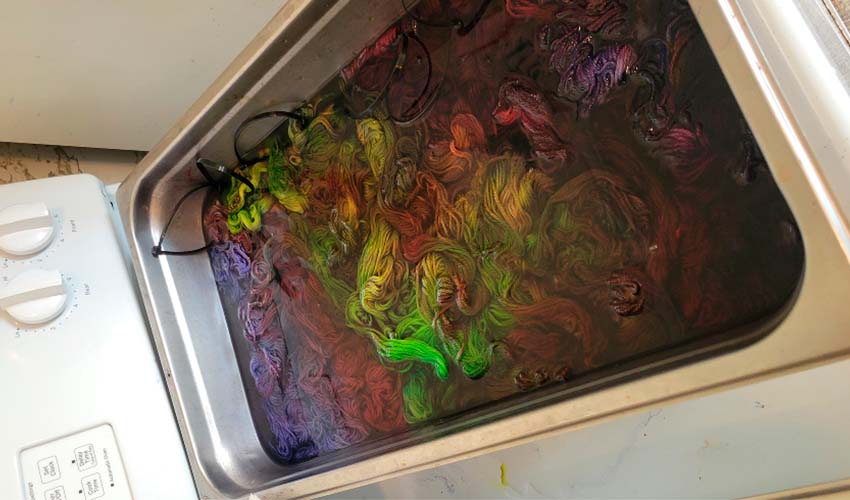
- Heat set your yarn using your preferred method. I chose to add two to three inches of water to the pan (the citric acid step should be enough to prevent your dye from rinsing out) and set it on the stove over low heat. Cover and allow the pan to heat at a bare simmer for thirty minutes or so, without allowing it to bubble. The water should be mostly if not completely clear throughout the entire process.
- Let your yarn cool fully, or if you’re impatient, at least to a comfortable handling temperature.
- Wash in hot but not scalding water with wool wash or teaspoon or so of dish soap, and rinse in water that is at least warm so as not to shock your yarn. Squeeze your skeins dry, twisting them as little as possible to do so. You may choose to roll them in a towel as with wet blocking, or spin dry them in a salad spinner or your washing machine.
- Give the skeins a good thwack if you like. I personally don’t do this on my own yarn, as it can lessen the elasticity a bit, but it does help the yarn hang nice and straight as it dries.
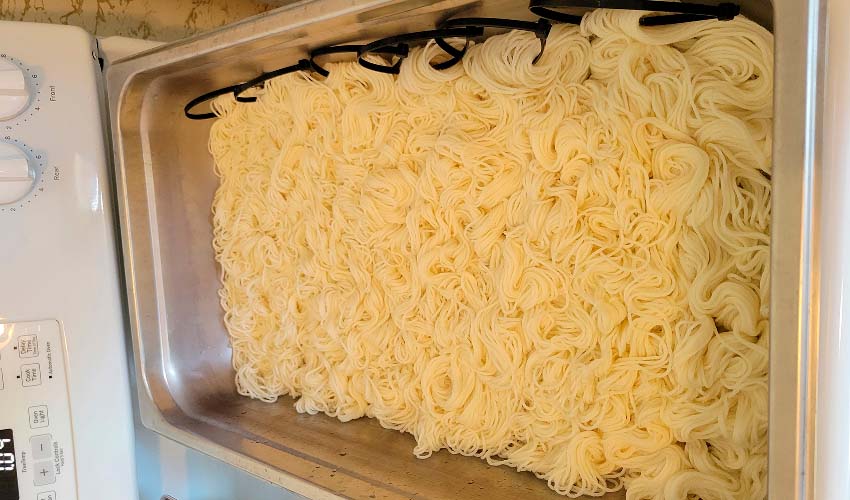
- Hang your skeins to dry where they can be spaced evenly apart and air can move around them easily, such as on a coat hanger over your shower rod. You can put a fan on them if you’d like to speed up the process a bit.
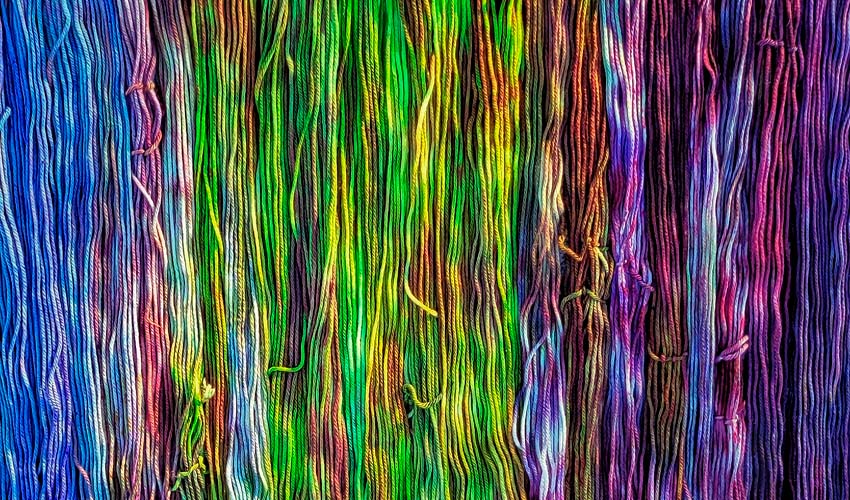
Once your skeins are dry, you’re done! Enjoy your minis and bask in the knowledge that you only needed one pan to dye all twelve. Job well done.


Leave a Reply